


stVff
Splunk turns Machine Data Into Answers
Splunk is the engine for machine data
Quick and easy way to…

The following considerations need to be taken into account before installing configuring:
Setting up a Splunk AWS instance details: Instance URL: ec2-1-2-3-4.eu-west-1.compute.amazonaws.com
Diagram of systems with a single EC2 Instance being the AIO. Only the UF agent (installed manually to clients) and TA (pushed to clients via DeploymentApp on Server, no manual install) are installed remote clients/hosts.
The AIO server is comprising of all these modules All-In-One:
Apps to Install:
Live-Splunk-App1 has the following:
List of apps command:
 cd /ops/splunk/apps/
 ls -lrt
/MNT/DATA is the 300GB DATA drive. A splunkdata folder needs to be created and then user SPLUNK has access to manage filder
chown -R splunk:splunk /splunkdataRebooting to refresh config:
/opt/splunk/bin/splunk restartchmod -R u+x /opt/splunk/apps/splunk TA_nix/bin
chown -R opt/splunk/apppsThen reboot. Thus apps asre visible pm left and also DATA MODELS
DOMAIN_all_deployments
DOMAIN_all forwarders
PORTS need to be whitelisted – 8089, 8081,8082, 9997 etc (see further for common ports
AGENT IS INSTALLED with a quiet CMD
>>>
Splunk Server is v7
Cluster Classes:
Creating an all_windows_server_test. Then edit classes to include relevant IP/DNS/hostname (whitelist IP/hostmame/DNS. Then add APPS, edit app, click to include and then SAVE)
Deploying RESTARTS the agent
Forwarding agent installation: Once installed to check if app is installed, click EDIT
Once installed and internal logs will start pushing (used for troubleshooting and proof)
TA-agents are important, these define what is being collected for Universal Forwarder Agent to push to Splunk
Unzip file in /deployment-apps/
Then’s the security defined:
chown – R – splunk:splunk /opt/splunk/etc/splunk/apps/
su splunk
pwd
cd splunk_TA_windows
DEPLOYMENT
Forward Managemetn – Edit – Click Move to right – Now we have 3 apps deployed
Then troubleshoot if TA works in > Splunk>Volume.Instances thus confirming Windows logs logging
Changes need to be applied:
OVERALL>SETTINGS>MONITORING CONSOLE> APPLY settings
In case Win Security is not showing – Windows Audit logs need to be enabled in MMC
Settings>Forward Mangement (top right)
Server classes > Create new class: LIVE (this is a new group for LIVE servers) # This is needed for new GROUPS of servers
Then we have two areas:
ADD APPS – All three apps – selected to be installed
ADD CLASSES – defines which servers to add
(include) – whitelist – prefered to allow whole VPC or server IP – Addind 10.1.100.* (NOTE: Dns does not work, splunk cannot ping hostname, even when visible in gui)
Note: AWS GATEWAY must be whitelisted for server with Private IP and VPC GW public IP
2.1.Agent is downloaded and silently installed via command. Go to folder and execute fillowinf
msiexec.exe /i splunkforwarder-7.1.1-8f0ead9ec3db-x64-release.msi DEPLOYMENT_SERVER=”1.2.3.4:8089″ AGREETOLICENSE=Yes SPLUNKPASSWORD=RELEVANT_CONPL /quiet
2.2.Firewall Whitelist the ProgramFiles > bin/splunkd.exe file
2.3.Enable Windows Security Logs in Locals Security Policy!!! (choose prefered success//failure audits)
2.4.Note: AWS GATEWAY must be whitelisted in SPLUNK ADMIN
2.5.SPL management – Forwarder Management – the new server is now showing as listed
2.6. Then to push apps to Agent Servers a deploy-server command need to be executed:
su splunk
(sudo -u) splunk /opt/splunk/bin/splunk reload deploy-server
2.7 Troubleshoot if agent is not connecting
Open logs in C:/ProgramFiles/UniversalForwarder/var/logs .. and read logs
Next image of logs listed the pointer of Splunk as an internal IP, which was not resolved by agent. Thus SPLUNK required additional outputs.config edit to add Splunk-server identified with its PUBLIC IP also!!!
3. Once installed, a verification can be done via SEARCH:
index=_internal | stats count by host
Example:
[WinEventLog://Security]
whitelist = 4,5,7,100-‐200
…
[WinEventLog://Security]
blacklist = EventCode=%^200$% User=%duca%
…
INDEX_EXTRACTIONS = {CSV | W3C | TSV | PSV | JSON}
INDEX_EXTRACTIONS = w3c
STDOUT data
— Normalize Fmestamps naFvely inside the SQL Query
— Filter results down in SQL Query to reduce garbage in Splunk Index.
— Repeated DBLookups should be converted to static lookup
— Search Head Pooling requires encrypted password replication
— Search Head Clustering Supported
Common ports listed below (All ports are TCP)
Optional ports for distributed systems:
Note: There’s confusion about port required from UFs to a HF. Which is 9997 too i.e. Many uses HF & DS as same server.
UFs —9997—> HF — 9997—> Indexers
UFs, Indexers, SHs —8089 —> DS
Directions of ports. Generally as below. Use tcpdump to verify
Source: https://answers.splunk.com/answers/58888/what-are-the-ports-that-i-need-to-open.html
Source: https://www.zeroex00.com/2018/06/writing-effective-queries-for-splunk.html Splunk is arguably one of the most popular and powerful tools across the security space at the moment, and for good reason. It is an incredibly powerful way to sift through and analyze big sets of data in an intuitive manner. SPL is the Splunk Processing Language which is used to generate queries for searching through data within Splunk.
The organization I have in mind when writing this is a SOC or CSIRT, in which large scale hunting via Splunk is likely to be conducted, though it can apply just about any where. It is key to be able to have relevant data sets for which to properly vet queries against. Fortunately, there are many example data sets available for testing on GitHub, from Splunk, and some mentioned below. There are also “data generators” which can generate noise for testing. Best of all would be to create your own though :).
I was fortunate to have had the enjoyable experience of participating in a Boss of the SOC CTF a few years back, which had some pretty good exemplar security related data. Earlier this year, they released the data set publicly here.
This guide is not meant to be a deep dive into the structuring of a query using the SPL. The best place for that is the Splunk documentation itself, starting with this. This is geared more towards operations in which multiple queries are written, maintained, and used in an operational capacity. Many of these concepts can be generalized and applied to other signatures, rules, code or programmatic functions, such as Snort, YARA, or ELK, in which a large quantity of multi-version discrete units must be maintained.
The ultimate goal of any Splunk query is to search and present data in order to answer some question(s). There are many right ways to search in Splunk, but there are often far fewer best ways (yes, multiple bests, see next sentence). Before formulating a search query, a couple considerations should be weighed and prioritized, such as accuracy, efficiency, clarity, integrity, and duration. It is easy to get spoiled by simply doing wildcard searches, but also just as easy to unnecessarily bog down a search with superfluous key value mappings. An over reliance of either can lead to problems.
Accuracy – are there multiple sources which can answer the question? If so, which is more reliable and authoritative? More importantly, how important is it to reduce or eliminate false positives from your results? There is a heavy inverse correlation between accuracy and efficiency.
Clarity – filtering down to the most relevant information needed to answer the question is only half of the battle –you still need to interpret it. It may be fine to view the results as raw data if there are only one or two results of non-complex data, but when there are rows of deeply structured data, taking the time to present it in the most appropriate manner will go a long way.
Duration – the length required for the query to complete. Is this a search that will be run often, and so delays are additive and add to total inefficiency; is there an urgent need to answer something ASAP; is a longer duration eating up resources on other running functions on the search head? Sometimes it is necessary to break a search into smaller sub-searches or to target smaller sets of data and then pivot from there.
Efficiency – closely tied to duration, an inefficient query will lead to unnecessary delays, excessive resource consumption, and could even effect the integrity of the data (pay close attention to implicit limitations of results on certain commands!). Paying attention to efficiency is especially important if there are per-user limitations on number of searches, memory usage, or other constraints.Too many explicitly defined wildcard placeholders could become very expensive, and the atomicity of a formulated query should always be considered.
Integrity – will you be manipulating any data as part of your search? If so, understand the risks to compromising the integrity of your results in doing so. The more pivots made on returned data, the more susceptible to loss of integrity the search becomes.
Write queries in a consistent and clear manner. Sometimes it is better to have a query take up many additional lines for the sake of better readability. Breaking into newlines on pipes is the defacto standard for readability purposes, as can be seen below.
event_simpleName IN (SyntheticProcessRollup2, ProcessRollup2) ImageFileName="*Windows\\\System32\\\\regsvr32.exe" CommandLine="*/i:http*" AND ParentCommandLine="*scrobj.dll*"
| rex field=CommandLine "/i:(?<sct_file_tmp>\S+)"
| eval sct_file=replace(sct_file_tmp, ":", "[:]")
| eval ParentProcess=ImageFileName
| eval ParentCLI=CommandLine
| eval ParentUser=UserName
| rename TargetProcessId_decimal AS ParentProcessId_decimal
| join ParentProcessId_decimal
	[search event_simpleName IN (SyntheticProcessRollup, ProcessRollup2)
	| eval ChildProcess=ImageFileName
	| eval ChildCLI=CommandLine
	| eval ChildUser=UserName]
| table _time ParentUser ParentCLI ChildProcess ChildCLI sct_file
Queries should be written in such a way that other people can modify it for their own adaptations or to update or expand a current one. Some ways to accomplish this would be using obvious variable names, readability, or even leaving in inexpensive functionality or variables which can be used for other purposes.
Modularity will lead to extensibility, maintainability, and resiliency. This will also increase efficiency as code reuse will be much simpler.
If the query is written for the purpose of manual sifting and analysis, then 50k results is not very reasonable. However, if it is for stateful preservation, alerts, or lookups, then that is more acceptable. Incorporating pivots on the information with subsearches and filtering or even, if necessary, breaking it up in to multiple different queries will make managing the results a surmountable task.
The data can change and so can the SPL itself (or even custom commands if used), so writing queries that are less effected by potential changes is important, especially if the effects of the changes are not obvious, which could lead to a loss of integrity in the results. (This is where testing is also important)
Having a style guide may seem like overkill, but if your operation is highly dependent on maintaining a repository of queries, it can go a long way. Naming conventions, spacing, line breaks, use of quotations, ordering, and style are some of the things to standardize to help with consistency.
Something as simple as:
| eval queryID=wxp-110
This ID can then be printed out with the results if needed or purely used as a means to categorize and quickly identify. Naming conventions should be obvious or recognizable (wxp = Windows XP, query 110), or even mappable to the repository itself.
This is obviously highly dependent on your usage and organizational structure, however, it never hurts to keep queries as simple as can be, since there is always the chance that someone else will need to maintain or interpret them. Bonus* less time needing to train people on their purpose!
I am a huge proponent of RTFM (F!=field, btw) for both myself and others. Splunk has put a lot of effort into meticulous documentation, which is clearly reflected in the detailed and thorough documentation. With regards to writing SPL queries, the search reference is your absolute best friend!
The first two things that I tell anyone to do that is new to Splunk is to familiarize yourself with the syntax of SPL (#10) and just as importantly, to get to know how the data is structured. The simplest way to do this is to do a wildcard search (*) and start reviewing the raw results under the events tab. The data will usually be structure in XML or JSON. Initially, it will be less important to know which data was structured from indexing, field extractions, or other transforms, but may become important with more advanced searches.
Do not ever merge a query into production ops, bless off on it, trust it, or whatever it is you do to give it legitimacy without first testing and confirmation of positive results. Regardless of how simple the query is, you can never guarantee that some other confounding issue isn’t occurring. If it is a matter of missing the applicable data, well then, Try Harder! There are many great products out there to help with this at scale, such as Red Canary’s atomic red team or Mitre’s caldera.
It can get stressful spending a lot of time on a query, only for it to not return the correct or any results, regardless of tweaking. The best way to build complex queries is to build them in pieces, testing as you go along. This is especially convenient because you can point to available data for the sake of testing to ensure positive results, and then change it as it is built out.
# ensure you have data for the computer
host=ComputerA

# ensure you have data being parsed from that computer to the CommandLine field
host=ComputerA CommandLine=*

# search for all occurences of python in command line activity for the computer
host=ComputerA CommandLine="*python*"

...

#search for all systems where powershell spawned a python program in which 3 or more parameters are passed
host=* ParentProcess="powershell.exe" process="python.exe"
| rex field=CommandLine "(\s-{1,2})(?<flags>\S+)" max_match=0
| stats count values(flags) by host
| where count>3
| sort 0 host
The necessity of this is really dependent on the amount of queries and modifications, though it makes sense even for small quantities. This can be accomplished as simply as baking a version into the query itself, such as from #8 with revisions tacked on with periods (wxp-110.3) or even in its own field:
| eval version=3
Even better than that would be to maintain them in a database or repository such as GitHub, which gives the added benefit of stateful change representations. It is also possible to save searches directly in Splunk, the version control is less intuitive in this way.
This doesn’t just apply to older versions of the same query, but queries which may search the same thing but present it in a different manner, search a different data set, or search a different time window.
It is all too easy to blow a full 12 hour shift perfecting a query, which may not even end up working at all. While it is important to have these search queries catered to your specific need, it is not always necessary to MacGyver it alone. There are lots of great resources available to borrow ideas or techniques from, such as the Splunk blogs and forums, or you can even work with a co-worker.
Counter to #16, you do not want to become over reliant on searching for help, as this could lead to running queries which may not be working as you think they are. This could also potentially compromise the integrity of the results. Worse yet, it could be an inefficient way of doing something which has caught on and persisted through the forums.
If you have written a gem or come up with a novel approach to something, share it back with the community. Even if the data set is different, there may still be much which can be gleaned from it. It also helps to drive conversations which benefit the community as a whole.
This is such an obvious one, but in spite of that, I still constantly find myself rewriting queries that I had previously written over and over again…
I don’t know why I have this all the way down at #20, because this is easily one of the most powerful and important concepts for which to be able to pivot on results with. There are several commands where regex is able to be leveraged, but the two most significant are regex and rex.
Regex does exactly what it says –allows you to filter on respective fields (or _raw) using regex, which in Splunk is a slimmed down version of PCRE. The rex command is much more powerful, in that it allows you to create fields based on the parsed data, which can then be used to pivot your searches on. You can even build it as a multivalued field if more than one match occurs. An example of the rex command (and potentially more than one value) can be seen in the example from #13.
Finally, we made it all the way to #21! Sometimes, depending on circumstance, function, and operational usage, manual searching with SPL queries is just not the best answer. Splunk has a lot of other functionality which can accomplish many of the same things, with less manual requirements. Alerts, scheduled reports, dashboards, and any of a number of apps built within or against the API allow for almost limitless capability. If you are struggling to maintain or achieve some of the topics annotated here, it may mean it is time to explore some of these alternative options.
This is certainly not an all inclusive list, as there are many more practices which can apply here. Ultimately, it depends on the specific deployment, implementation, and usage of Splunk which should dictate exactly how you create and maintain search queries. This was also not meant to go too deep in the weeds on generating advanced queries (though that may come in the future), but rather a high level approach to maintaining quality and standards. There are many other people who are far more experienced and with much greater Splunk-fu out there, so if you have any input or insight, please feel free to reach out.
Quick steps to install available below:
Accessing the EC2 instance via SSH or BitViseSSH or OpenSSH (described in another post .Link here soon)
You have two options accessing the EC2 instance:
• Connect via your browser using the Java SSH Client provided by AWS
• Connect using PuTTY: a free telnet/ssh client
If you choose to use PuTTY you will need to convert the PEM Key. Using BitViseSSH does not require convertion
Check for Yum Updates
sudo yum check-update
Install updates via Yum
sudo yum update
Install HAProxy from EPEL repository
sudo yum install haproxy
Backup HAProxy configuration
sudo cp /etc/haproxy/haproxy.cfg /etc/haproxy/haproxy.cfg_orig
sudo cp /etc/haproxy/haproxy.cfg /etc/haproxy/haproxy.cfg_backup
Change permissions on haproxy.cfg_orig
sudo chown ec2-user:ec2-user /etc/haproxy/haproxy.cfg_orig
Update the temporary HAProxy configuration file
/etc/haproxy/haproxy.cfg_orig
Below is the working config of current HAPROXY:
The BOLD ITEMS in the config are the variables that need updating.
#---------------------------------------------------------------------
# Example configuration for a possible web application. See the full configuration options online.
# http://haproxy.1wt.eu/download/1.4/doc/configuration.txt
#Global settings
---------------------------------------------------------------------
chroot      /var/lib/haproxy
pidfile     /var/run/haproxy.pid
maxconn     4000
user        haproxy
group       haproxy
daemon

# turn on stats unix socket
stats socket /var/lib/haproxy/stats

global
# to have these messages end up in /var/log/haproxy.log you will
# need to:
#
# 1) configure syslog to accept network log events. This is done
# by adding the '-r' option to the SYSLOGD_OPTIONS in
# /etc/sysconfig/syslog
#
# 2) configure local2 events to go to the /var/log/haproxy.log
# file. A line like the following can be added to
# /etc/sysconfig/syslog
#
# local2.* /var/log/haproxy.log
#
log 127.0.0.1 local2
---------------------------------------------------------------------
common defaults that all the 'listen' and 'backend' sections will use if not designated in their block
---------------------------------------------------------------------
defaults
mode http
log global
option httplog
option dontlognull
option http-server-close
option forwardfor except 127.0.0.0/8
option redispatch
retries 3
timeout http-request 10s
timeout queue 1m
timeout connect 10s
timeout client 1m
timeout server 1m
timeout http-keep-alive 10s
timeout check 10s
maxconn 40000
---------------------------------------------------------------------
main frontend which proxys to the backends
---------------------------------------------------------------------
frontend main *:80
Next two lines added instead of the one above
frontend http-in
bind :80
acl url_static path_beg -i /static /images /javascript /stylesheets
acl url_static path_end -i .jpg .gif .png .css .js
use_backend static          if url_static
default_backend             app

---------------------------------------------------------------------
static backend for serving up images, stylesheets and such
---------------------------------------------------------------------
backend static<br>     balance     roundrobin<br>     server      static 172.1.2.3:8000 check
---------------------------------------------------------------------
round robin balancing between the various backends
---------------------------------------------------------------------

backend app
balance     roundrobin
server  app1 1723.2.1:80 check

<pre class="wp-block-code"><code>#Stat Listeng setup below
listen stats 0.0.0.0:9000       #Listen on all IP's on port 9000
mode http
balance
timeout client 5000
timeout connect 4000
timeout server 30000

#This is the virtual URL to access the stats page
stats uri /haproxy_stats

#Authentication realm. This can be set to anything. Escape space characters with a backslash.
stats realm HAProxy\ Statistics

#The user/pass you want to use. Change this password!
stats auth administrator:password

#This allows you to take down and bring up back end servers.
#This will produce an error on older versions of HAProxy.
stats admin if TRUE
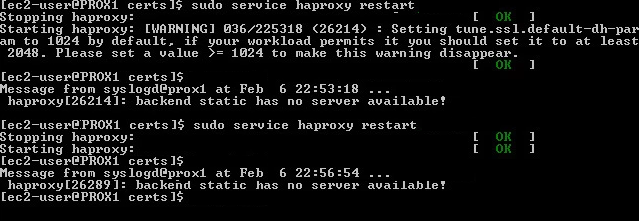
Starting HAProxy
1 sudo service haproxy start
Getting HAProxy’s Status
1 sudo service haproxy status
Stopping HAProxy
1 sudo service haproxy stop
Security Groups
The configuration above would require a security group configured like
• Allow port 22 from your office IP e.g. XXX.XXX.XXX.XXX/32
• Allow 8000 access from your office IP
• Allow HTTP (port 80) access from everyone e.g. 0.0.0.0/0
• Allow HTTPS (port 443) access from everyone
How To prepare your SSL files
Creating a .pem with the Private Key and Entire Trust Chain
-----BEGIN RSA PRIVATE KEY-----
(Your Private Key: your_domain_name.key)
-----END RSA PRIVATE KEY-----
-----BEGIN CERTIFICATE-----
(Your Primary SSL certificate: your_domain_name.crt)
-----END CERTIFICATE-----
-----BEGIN CERTIFICATE-----
(Your Intermediate certificate: DigiCertCA.crt)
-----END CERTIFICATE-----
-----BEGIN CERTIFICATE-----
(Your Root certificate: TrustedRoot.crt)
-----END CERTIFICATE-----
 -----BEGIN RSA PRIVATE KEY-----
 (Your Private Key: your_domain_name.key)
 -----END RSA PRIVATE KEY-----
 -----BEGIN CERTIFICATE-----
 (Your Primary SSL certificate: your_domain_name.crt)
 -----END CERTIFICATE-----
 -----BEGIN CERTIFICATE-----
 (Your Intermediate certificate: DigiCertCA.crt)
 -----END CERTIFICATE-----
 -----BEGIN CERTIFICATE-----
 (Your Root certificate: TrustedRoot.crt)
 -----END CERTIFICATE-----
Save the combined file as your_domain_name.pem. The .pem file is now ready to use.
Adding SSL to HAPROXY
frontend web-https
         bind public_ip:443 ssl crt /etc/ssl/certs/server.bundle.pem
         reqadd X-Forwarded-Proto:\ https
         rspadd Strict-Transport-Security:\ max-age=31536000
         default_backend www-backend
To explain:
• bind public_ip:443 (change public_ip to your VPS public ip) tells HAProxy to listen to any request that is sent to the ip address on port 443 (the HTTPS port).
• ssl crt /etc/ssl/certs/server.bundle.pem tells HAProxy to use the SSL certificate previously generated.
• reqadd X-Forwarded-Proto:\ https adds the HTTPS header to the end of the incoming request.
• rspadd Strict-Transport-Security:\ max-age=31536000 a security policy to prevent against downgrade attacks.
You do not need to make any additional changes to your backend section.
If you wish to have HAProxy use HTTPS by default, add redirect scheme https if !{ ssl_fc } to the beginning of the www-backend section. This will force HTTPS redirection.
Save your configuration and run service haproxy restart to restart HAPRoxy. Now you’re all set to use HAProxy with an SSL endpoint.
Read more at: https://www.vultr.com/docs/add-ssl-termination-to-haproxy-on-ubuntu
Warning is given off when restaring haproxy. SSL encryption set to default of 1024 is too low. Enforced to 2048 in Global config space in haproxy.cfg file!
tune.ssl.default-dh-param
Sets the maximum size of the Diffie-Hellman parameters used for generating the ephemeral/temporary Diffie-Hellman key in case of DHE key exchange. The
final size will try to match the size of the server’s RSA (or DSA) key (e.g, a 2048 bits temporary DH key for a 2048 bits RSA key), but will not exceed
this maximum value. Default value if 1024. Only 1024 or higher values are allowed. Higher values will increase the CPU load, and values greater than
1024 bits are not supported by Java 7 and earlier clients. This value is not used if static Diffie-Hellman parameters are supplied via the certificate file.
Source: https://cbonte.github.io/haproxy-dconv/configuration-1.5.html#tune.ssl.default-dh-param
UPDATE 2019 – See Usage of CRT-LIST
Used for dedicating a single SSL pem per binding. Utilising multiple port 443 SSL on one server (Unlike the Windows Server single server per port)
Enable HAProxy Logging
Enabling logging in HAProxy is very simple. First edit the rsyslog.conf file:
sudo vi /etc/rsyslog.conf
Then find the following two lines, and uncomment them to enable UDP syslog reception. It should look like the following when you are done:
$ModLoad imudp
$UDPServerRun 514
$UDPServerAddress 127.0.0.1
Now restart rsyslog to enable the new configuration:
sudo service rsyslog restart
HAProxy logging is is now enabled! The log file will be created at /var/log/haproxy.log once HAProxy is started.
SOURCE:
https://www.digitalocean.com/community/tutorials/how-to-implement-ssl-termination-with-haproxy-on-ubuntu-14-04
https://serversforhackers.com/using-ssl-certificates-with-haproxy
SSL with pass-through to backend server ssl termination: https://serversforhackers.com/using-ssl-certificates-with-haproxy
SSL config CMD
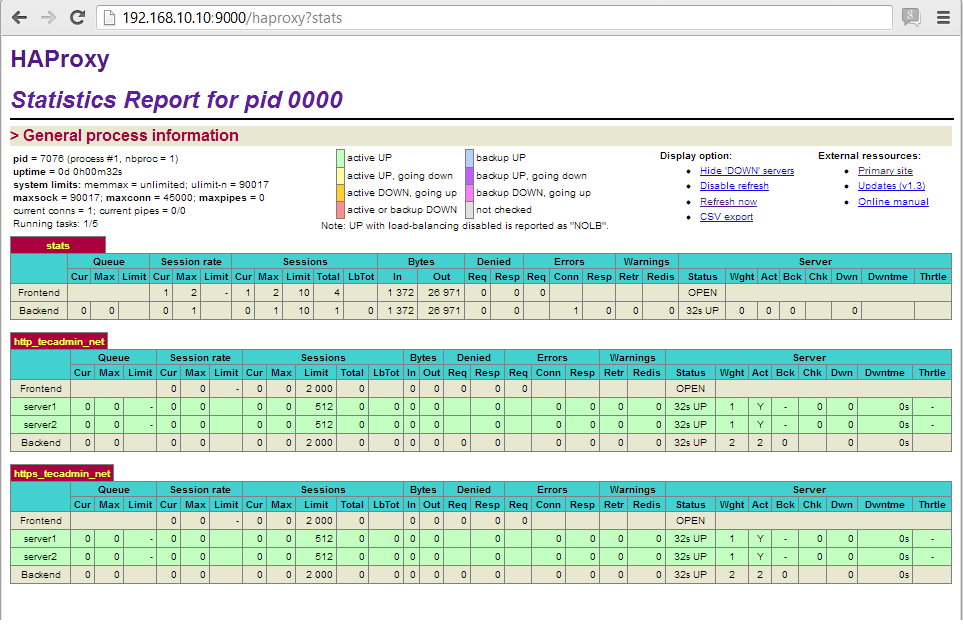
Metrics to monitor and collect them! You can either use HAProxy’s built-in tools or a third-party tool. HAProxy gives you two means by which you can monitor its performance: via a status page, or via sockets. Both of the methods below give you an immediate and detailed view into the performance of your load balancer. The main difference between the two is that the status page is static and read-only, whereas the socket interface allows you to modify HAProxy’s configuration on the fly.
The most common method to access HAProxy metrics is to enable the stats page, which you can then view with any web browser. This page is not enabled out of the box, and requires modification of HAProxy’s configuration to get it up and running.
To enable the HAProxy stats page, add the following to the bottom of the file /etc/haproxy/haproxy.cfg (adding your own username and password to the final line):
listen stats # Define a listen section called "stats"
  bind :9000 # Listen on localhost:9000
  mode http
  stats enable  # Enable stats page
  stats hide-version  # Hide HAProxy version
  stats realm Haproxy\ Statistics  # Title text for popup window
  stats uri /haproxy_stats  # Stats URI
  stats auth Username:Password  # Authentication credentials
This sets up a listener on port 9000 in HTTP mode with statistics enabled.
Next you’ll need to restart HAProxy, which can interrupt client sessions and cause downtime. If you want to be very careful about how you restart HAProxy, check out Yelp’s research on the least disruptive means by which you can reload HAProxy’s configuration.
If you’re comfortable with session interruption, you can restart HAProxy with
sudo service haproxy restart.
After
restarting HAProxy with your modified configuration, you can access a
stats page like the one below after authenticating via the URL: http://<YourHAProxyServer>:9000/haproxy_stats
Haproxy has a build in stat page. Set to port 9000 and the dashboard will show up.
Change Login Details
If you want to changed login details of HAProxy stats, edit your configuration and update “stats auth” value like below
stats auth username:password
Save configuration file and restart HAProxy to update service.
Change HAProxy Stats URL
To change url of haproxy stats edit configuration file and update following value.
stats uri /ha-stats
or
stats uri /stats
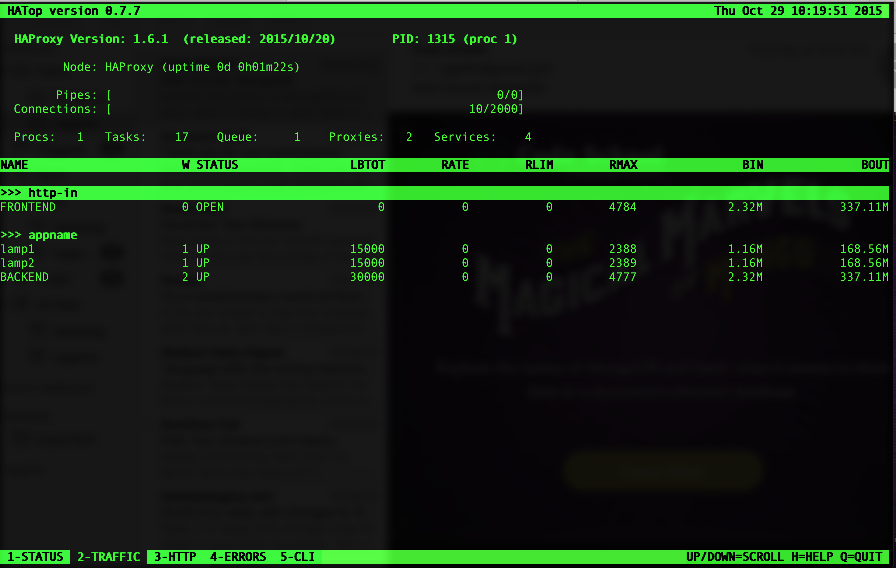
There is no shortage of third party tools available in the HAProxy community, though many are unmaintained. Luckily, there is HATop. (See http://feurix.org/projects/hatop/)
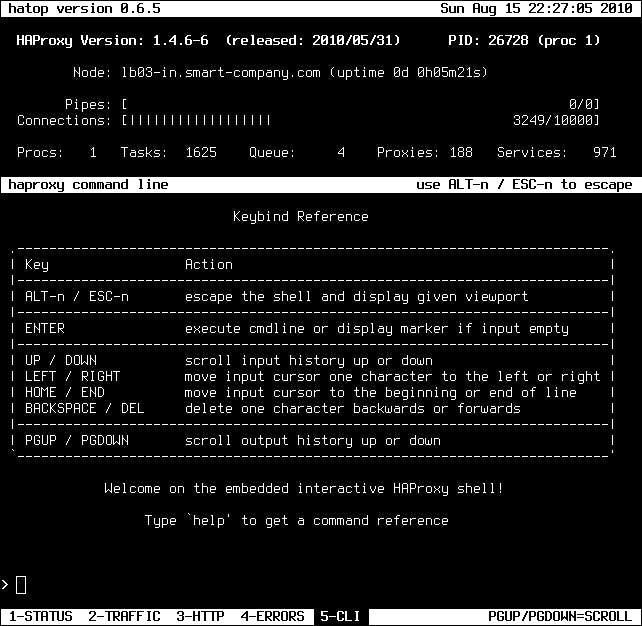
HATop to this day remains the go-to tool for taking a closer look at a running HAProxy service. HATop was designed to mimic the appearance of htop. It is an excellent management and diagnostics tool capable of overseeing the entirety of your HAProxy service stack.
Once downloaded, start HATop with the following command (assuming HATop is in your PATH): hatop -s /var/run/haproxy.sock
You should see something similar to the screen below:
The idea is to reasocciate the EIP (ElasticIP) in case the primary (MASTER) HAProxy services stops or server goes unresponsive to a secondary standby HAProxy (BACKUP) box
That is achieved by running KEEPALIVED service pinging each other at VRRP protocol each second. In case of lost responce a script is executed to reassociate EIP to backup server running haproxyservice.
That’s close to Emulating Active/passing application clustering with HAProxy
Important palces:
Haproxy config: /etc/haproxy/haproxy.cfg
Keepalived config: /etc/keepalived/keepalived.conf
VRRP.SH script that’s to execute is at: /etc/keepalived/vrrp.sh
Keepalived is used for IP failover between two servers. It facilities for load balancing and high-availability to Linux-based infrastructures. It works on VRRP ( Virtual Router Redundancy Protocol ) protocol. We have running two load balance servers using HAProxy and now we need to implement VRRP between both servers.
Keepalived is available in centos base repository. Install it using yum command line tool.
# yum install keepalived
Keepalived configuration File: /etc/keepalived/keepalived.conf
The configuration must be set to one like the below:
Here is the main HAPROXY keepalived config
vrrp_script chk_haproxy {
    script "pidof haproxy"
    interval 2 # check every 2 seconds
}

vrrp_instance VI_1 {
    interface eth0 # the primary interface, no secondary one used, or floating IP as in internal IPs with sharing single IP; interface to monitor
    state MASTER # the secondary server should have BACKUP state
    priority 101 # secondary server will be having priority 100 instead

    virtual_router_id 33 # same for both virtual routers, Assign one ID for this route
    unicast_src_ip 10.1.2.3 # PRIVATE IP of  main server , the localhost
    unicast_peer {
        10.3.2.1 #PRIVATE IP of secondary , that is talked to
    }

    authentication {
        auth_type PASS # same for both
        auth_pass 123456 # same for both
    }

    track_script {
        chk_haproxy
    }

    notify_master /etc/keepalived/vrrp.sh # location of the script to run in case of failing haproxy service
}
1. Priority value will be higher on Master server, It
doesn’t matter what you used in state. If your state is MASTER but your
priority is lower than the router with BACKUP, you will lose the MASTER state.
2. virtual_router_id should be same on both LB1 and LB2
servers.
3. By default single vrrp_instance support up to 20 virtual_ipaddress.
In order to add more addresses you need to add more vrrp_instance
And Here is the secondary HAPROXY
vrrp_script chk_haproxy {
    script "pidof haproxy"
    interval 2
}

vrrp_instance VI_1 {
    interface eth0
    state BACKUP
    priority 100

    virtual_router_id 33
    unicast_src_ip 10.3.2.1
    unicast_peer {
        10.1.2.3
    }

    authentication {
        auth_type PASSWORD
        auth_pass 123456
    }

    track_script {
        chk_haproxy
    }

    notify_master /etc/keepalived/vrrp.sh
}
# ip addr show eth1

[root@PROX1 haproxy]# ip addr show eth0
2: eth0: <BROADCAST,MULTICAST,UP,LOWER_UP> mtu 9001 qdisc pfifo_fast state UP group default qlen 1000
    link/ether 07:a7:4f:e1:25:00 brd ff:ff:ff:ff:ff:ff
    inet 10.1.1.1/24 brd 10.1.110.255 scope global eth0
       valid_lft forever preferred_lft forever
    inet6 fe80::aa7:ffff:fee0:2505/64 scope link
       valid_lft forever preferred_lft forever
[root@PROX1 haproxy]#
By default virtual ip will assigned to master server, In case of master get down, it will automatically assigned to slave server. Use following command to show assigned virtual ip on interface.
# ss – l |grep vrrp
raw    UNCONN     0      0       *:vrrp                  *:*
raw    UNCONN     0      0       *:vrrp                  *:*
[root@PROX1 haproxy]# tcpdump -i eth0 ip proto 112
tcpdump: verbose output suppressed, use -v or -vv for full protocol decode
listening on eth0, link-type EN10MB (Ethernet), capture size 65535 bytes
Communication between both servers must be established, else resolve the Security Groups and visibility to talk.
If you do not see any communication, than make sure keepalived service started on both nodes:
# service keepalived status
# service keepalived start
Make sure firewall is configured to accept accept multicast and vrrp protocol (IP Protocol # 112): Usually not required!
# /sbin/iptables -I INPUT -i eth0 -d
224.0.0.0/8 -j ACCEPT
# /sbin/iptables -A INPUT -p 112 -i eth0 -j ACCEPT
# /sbin/iptables -A OUTPUT -p 112 -o eth0 -j ACCEPT
# /sbin/service iptables save
Add the following for CentOS/RedHat/Fedora:
Tell kernel to allow binding non-local IP into the hosts and apply the
changes:
Edit following /etc/sysctl.conf
# net.ipv4.ip_nonlocal_bind = 1
Apply changes
sysctl -p
To determine whether a server is acting as the master, you can use the ip command to see whether the virtual address is active, for example:
# ip addr list eth0 3: eth0: <BROADCAST,MULTICAST,UP,LOWER_UP> mtu 1500 qdisc pfifo_fast state UP qlen 1000 link/ether 08:00:27:cb:a6:8d brd ff:ff:ff:ff:ff:ff inet 10.0.0.72/24 brd 10.0.0.255 scope global eth0 inet 10.0.0.100/24 scope global eth0 inet6 fe80::a00:27ff:fecb:a68d/64 scope link valid_lft forever preferred_lft foreverAlternatively, search for Keepalived messages in /var/log/messages that show transitions between states, for example:
...51:55 ... VRRP_Instance(VRRP1) Entering BACKUP STATE
...
...53:08 ... VRRP_Instance(VRRP1) Transition to MASTER STATE
...53:09 ... VRRP_Instance(VRRP1) Entering MASTER STATE
...53:09 ... VRRP_Instance(VRRP1) setting protocol VIPs.
...53:09 ... VRRP_Instance(VRRP1) Sending gratuitous ARPs on eth0 for 10.0.0.100
That’s a simple script that holds the AWS credentials and the reassociation command to move EIP to backup server when triggered!
#!/bin/bash
#vrrp.sh
#Add this line in ordet to detect when script is executed
echo “———-vrrp.sh running ——” >> /var/log/messages
#Change dir to executable area
cd /opt/aws/apitools/ec2/bin/
#Those are the actual access/secret keys!!!
export JAVA_HOME=/etc/alternatives/jre
export EC2_HOME=/opt/aws/apitools/ec2
export AWS_ACCESS_KEY=AKIA12345000000000000
export AWS_SECRET_KEY=123432543534000000000
export EC2_URL=https://ec2.eu-west-1.amazonaws.com
export PATH=$PATH:$JAVA_HOME/bin:$EC2_HOME/bin
#EIP reassociation command, assigning EIP to secondary HAProxy server
./ec2-associate-address -a eipalloc-abcd1234 -i i-012345abcd –allow-reassociation
aws ec2 associate-address –instance-id i-012345abcd –public-ip 1.2.3.4
associate-address
[--dry-run | --no-dry-run]
[--instance-id <value>]
[--public-ip <value>]
[--allocation-id <value>]
[--network-interface-id <value>]
[--private-ip-address <value>]
[--allow-reassociation | --no-allow-reassociation]
[--cli-input-json <value>]
[--generate-cli-skeleton]
Commands slightly differs for EC2-Classic and VPC instances
–dry-run | –no-dry-run (boolean)
Checks whether you have the required permissions for the action, without actually making the request, and provides an error response. If you have the required permissions, the error response is DryRunOperation . Otherwise, it is UnauthorizedOperation .
–instance-id (string)
The ID of the instance. This is required for EC2-Classic. For EC2-VPC, you can specify either the instance ID or the network interface ID, but not both. The operation fails if you specify an instance ID unless exactly one network interface is attached.
–public-ip (string)
The Elastic IP address. This is required for EC2-Classic.
–allocation-id (string)
[EC2-VPC] The allocation ID. This is required for EC2-VPC.
–network-interface-id (string)
[EC2-VPC] The ID of the network interface. If the instance has more than one network interface, you must specify a network interface ID.
–private-ip-address (string)
[EC2-VPC] The primary or secondary private IP address to associate with the Elastic IP address. If no private IP address is specified, the Elastic IP address is associated with the primary private IP address.
–allow-reassociation | –no-allow-reassociation (boolean)
[EC2-VPC] For a VPC in an EC2-Classic account, specify true to allow an Elastic IP address that is already associated with an instance or network interface to be reassociated with the specified instance or network interface. Otherwise, the operation fails. In a VPC in an EC2-VPC-only account, reassociation is automatic, therefore you can specify false to ensure the operation fails if the Elastic IP address is already associated with another resource.
–cli-input-json (string) Performs service operation based on the JSON string provided. The JSON string follows the format provided by –generate-cli-skeleton. If other arguments are provided on the command line, the CLI values will override the JSON-provided values.
–generate-cli-skeleton (boolean) Prints a sample input JSON to standard output. Note the specified operation is not run if this argument is specified. The sample input can be used as an argument for –cli-input-json.
To associate an Elastic IP addresses in EC2-Classic
This example associates an Elastic IP address with an instance in EC2-Classic. If the command succeeds, no output is returned.
Command: aws ec2 associate-address –instance-id i-0123456789 –public-ip 1.2.3.4
To associate an Elastic IP address in EC2-VPC
This example associates an Elastic IP address with an instance in a VPC.
Command: aws ec2 associate-address –instance-id i-987654321 –allocation-id eipalloc-abcd1234
Output:
{
    "AssociationId": "eipassoc-2bebb745"
}
This example associates an Elastic IP address with a network interface.
Command: aws ec2 associate-address –allocation-id eipalloc- 987654321a –network-interface-id eni- 12345abcd
This example associates an Elastic IP with a private IP address that’s associated with a network interface.
Command: aws ec2 associate-address –allocation-id eipalloc-987654321a –network-interface-id eni- 12345abcd –private-ip-address 10.0.0.xx
The aboved User access keys reflect the role attached to the above user keys. That’s basically association and describe ec2 tasks:
Use the following IAM policys to be able to list and reassociate Elastic IPs. This can probably be narrowed down abit. It allows EC2 read-only (from the IAM wizard) and ec2:ReassociateAddress permissions:
{
  "Statement": [
    {
      "Effect": "Allow",
      "Action": [
        "ec2:AssociateAddress",
        "ec2:AttachNetworkInterface",
        "ec2:CreateNetworkInterface",
        "ec2:DescribeInstances",
        "ec2:DescribeNetworkInterfaces",
        "ec2:DescribeSecurityGroups",
        "ec2:DescribeSubnets",
        "ec2:DetachNetworkInterface"
        "ec2:Describe*",
 ],
      "Resource": "*"
    }
  ]
}1.And make sure your shell script is executable (chmod +x) <filename>
The man page of chmod covers that.
That means that chmod u+x somefile will grant only the owner of that file
execution permissions whereas chmod +x
somefile is the same as chmod
a+x somefile.
chmod u+x will
made the file executable for your user (it will only add it for your user,
though it may be already executable by the group owner, or “other”).
chmod +x or chmod a+x(‘all plus executable bit’) makes the file executable by everyone.
2. Use the binding to nonlocal IP if using virtual/floating IP: # net.ipv4.ip_nonlocal_bind = 1
3. Edit /etc/default/haproxy
and make sure it has a line that says ENABLED=1
in it.
4. Showing of assigned IPs to an interface: # ip addr list eth0
5. Only one server should be active as the master at any time. If more than one server is configured as the master, it is likely that there is a problem with VRRP communication between the servers. Check the network settings for each interface on each server and check that the firewall allows both incoming and outgoing VRRP packets for multicast IP address 224.0.0.18. Valid for floating/Virtual IP mostly
6. Any scripts is always starting with #! – Shebang
(Unix), the #! syntax
used in computer programs to indicate an interpreter for execution
Among UNIX shell (user interface) users, a shebang is a term for the “#!” characters that must begin the first line of a script. In musical notation, a “#” is called a sharp and an exclamation point – “!” – is sometimes referred to as a bang. Thus, shebang becomes a shortening of sharp-bang
#!/bin/bash
#vrrp.sh
7. Monitor messages with # tail -f /var/log/messages
8.Setup can be improved with using AWSCLI insteade AWS EC2
9. Identify autostart services in Fedora:
A built-in system command called chkconfig can also show you startup services that are available on RedHat-based systems. To find a list of currently active startup services, run the following:
$ chkconfig –list | grep $(runlevel | awk ‘{ print $2 }’):on
10. Configure Logging for HAPROXY – in config
One of the first things you should do is to set up proper logging for your HAProxy, which will be useful for future debugging. Log configuration can be found in the global section of /etc/haproxy/haproxy.cfg. The following are distro-specific instructions for configuring logging for HAProxy.
CentOS or RHEL:
To enable logging on CentOS/RHEL, replace:
log 127.0.0.1 local2 with
log 127.0.0.1 local0 The backend section of the configuration file is responsible for the balancing algorithm. Haproxy has 9 algorithms.
The first in the list and the simplest algorithm is Round Robin. You can turn it on by entering “balance round robin” in the backend section.
With this option, HAProxy will iterate over the servers and evenly load your “farm”. The example:
* in my case luna-1 — it is an alias inside the private network. In your case, it could be IP-address.
If you’ll add to the server list the weight parameter, you’ll get a more advanced version of the algorithm called weighted round robin:
Due to different values of weights, the balancer distributes the load based on the physical capabilities of the servers. And a server with a weight parameter 2 in the example above gets 2 times more requests than with a weight parameter of 1.
PRO: The algorithm could achieve a clear, predictable and stable balancing. All servers in this case, in accordance with their weight value, get a fair number of processing requests.
CON: However, the Round Robin has one drawback, which prevents of using it with long sessions. The algorithm ignores the number of active connections. And even if one node is fully loaded, it will still receive new requests.
I will say briefly about this algorithm. In fact, the Static-rr it’s the same as Round robin. One exception: change of the servers’ weight on the fly will have no effect. But Static-rr is not limited by the number of backends in contrast to Round robin, which can work with up to 4095 active servers.
You can turn it on by entering “balance static-rr” in the backend section.
The algorithm called “least connections” count the number of active connections to each server. Thus, every following request is delivered to the server with the lowest number of active connections. You can turn the algorithm on by entering “balance leastconn” in the backend section.
This algorithm is dynamic, which means that server weights may be adjusted on the fly for slow starts for instance.
PRO: “Least connections” is suitable for tasks associated with long-term connections. For example, it could be load balancing between database servers. If some nodes would have too many active connections, they will not get new queries.
CON: There is no sense to use the algorithm for tasks with short sessions, it could be HTTP protocol for example. For this purposes, it will be better to use a Round Robin option.
The algorithm appeared in HAProxy from version 1.5. If you apply it, the balancer will start to fill free connection slots from the first server to the next one by one.
To turn the algorithm on you should enter “balance first” in the backend section.
PRO: The main goal of the algorithm “First” is to use the least amount of servers. It allows you to turn off additional servers in non-intensive hours. To feel the full effect you should set a controller for regularly checking the servers in the farm. It will be turning off unused servers and turning on additional resources at high load.
CON: I can’t say that it is a minus due to the nature of the algorithm. However, the algorithm doesn’t take into consideration the weight of the servers and balance the load depending on maxconn value.
By using this algorithm, the source IP address is hashed and divided by the total weight of the running servers to determine which server will receive the request. Therefore, a source with the same IP address will always be directed to the same server. You can enable this option using “balance source”.
PRO: The algorithm is usually used to work by the TCP Protocol, where it is impossible to assign cookies.
CON: If the source has a dynamic IP, the algorithm will not be able to link its session to the same server.
The algorithm selects a server based on a page address. It allows the same server to handle specific page addresses. You can enable the algorithm using the “balance uri” option.
+ The algorithm is used for load balancing between caching servers. If you’ll try to use other solutions, the total cache size on all nodes will be inflated. In the case of the URI algorithm, a request gotten from a specific address will be sent
to the server which has the cache for this page.
CON: The disadvantage of the algorithm is its narrow specificity of application. My opinion is that the history with caching servers is the only one where the solution is applicable.
The URL parameter algorithm chooses a server based on the GET parameter of the query. If you’ll add the modifier “check_post”, then the algorithm will be making decisions depending on the argument of the parameter. For clarity, I’m going to show you two examples:
In the first example, the algorithm will route user requests to the same server based on the value of their userid. In the second example, the algorithm will assign a specific server for processing requests with a session id 64.
If no parameters are received, the algorithm will balance the load like a Round robin.
PRO: URL parameter может быть полезен, если вы хотите закрепить сервера за авторизованными пользователями, а для анонимных распределять нагрузку с помощью простого Round Robin.
CON: The algorithm will only work in HTTP mode. It is useless for TCP traffic.
The algorithm selects a server based on an HTTP request header. If there won’t be any value in the header, it will work like the Round Robin algorithm.
In this case, HAProxy will look for the entry “User-Agent: Mozilla / 5.0” in the request header.
PRO: The algorithm will be useful if you need, for example, to link users to servers by browser type, query address, and so on.
CON: On the other hand, the algorithm is suitable for very specific narrow tasks.
The algorithm is equivalent to ACL ‘req_rdp_cookie ()’ of the Frontend section. Its purpose is to link the same user to a specific server same server with the identification of the cookie. Its purpose is to link the same user to a specific server by cookies identification.
PRO: The algorithm is suitable for linking sessions with certain cookies to specific servers.
CON: If cookies are not used by the client, the algorithm will work as a primitive Round robin.
Usually, 2 algorithms from the list are used: Round Robin and Leastconn. The first is useful for HTTP traffic and the second one for database maintenance. The rest algorithms are used depending on the situation.
Using Windows 7 Enterprise with features such as BitLocker Drive Encryption can be used in your corporate environment.
Normally this would require a full re-install of the Operating System and all of your programs and config as Microsoft does not provide any sort of upgrade path in this situation.
If you follow the steps below then you can get around this restriction and upgrade the Operating system from Windows 7 Pro to Enterprise and keep all of you programs and configuration settings in tact.
First of all a warning: This is not supported by Microsoft officially yet we’ve got SA licence keys for all verisons of Windows 7 and 8 untill May 2017.
This is simple approach that works quite well but takes the same amount of time as a re-install would. The upside is that it keeps all previously installed applications (and data) which is handy when you have a preconfigured machine.
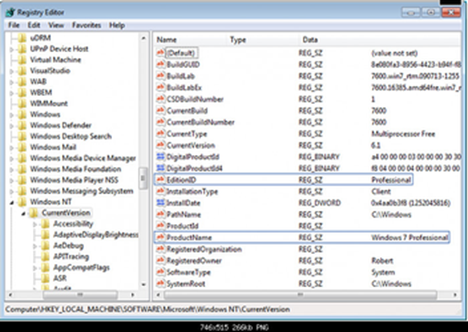
HKEY_LOCAL_MACHINE\SOFTWARE\Microsoft\Windows NT\CurrentVersion
Next you will need your Windows 7 Enterprise ISO. Please use The full ISO Windows7 Enterprise SP1
Insert it into your computer and run the “setup.exe” to start the upgrade process off.
Click on “Install now” and then select the “Upgrade” option. The Windows installation will now upgrade your Windows 7 Pro version to Windows 7 Enterprise.
This part will take quite a long time so just be patient with it.
Once completed you will probably need to check and install any Windows updates, and as in my case I had to reinstall the RSAT tools again.
Overall Reg changes in image below:
Caveats and notes
1) You will of course need Enterprise install media AND a valid Enterprise license to complete this.
2) Do the backups (if keeping settings is mandatory) suggested in case something gets screwed up
3) If upgrading an OEM installation that’s new from the box, don’t bother with Windows updates beforehand. They will all need to be reapplied later. You will however need to at least run through the initial welcome setup to get into Windows and make the registry changes. (and the backup – I skipped that on the out of the box one as it had a restore to factory system that came with it that I could use)
4) The registry keys shown in the example need to be changed to “Enterprise” where it says “Professional”. Upgrading with no REGEDIT change will fail
5) You run setup on the install DVD from within the existing windows (rather than booting from the CD). Upgrading with same version Win7PRO tp Win7Ent says ”the version installed is newer”. Ensure you’re upgrading to the same service pack level. If you’re running Professional SP1, then upgrade to Enterprise SP1
6) After the upgrade install, it will go through device detection as the devices get removed during the install… however all the OEM’s drivers will be there already , so it is just a mater of waiting for Windows to find them all and reinstall the devices. No manual intervention was required on my part… just watching “Windows has found a new device and is installing drivers…” do it’s thing. This saves a TON of time vs tracking down and installing all the drivers manually from the manufacturer’s website if you were to have done a clean reinstall. Especially in the case where you start with a VGA resolution screen and no networking support.
7) As previously mentioned, Windows updates will need to be reapplied is if it were a new install.
8) User accounts, and pre-installed software and OEM drivers seem to be uneffected by the upgrade and things work as expected afterwards. So far at least for me.
9 ) If your Professional install has been deployed for a while, this method may not work.
11) How to Do a Repair Install to Fix Windows 7 (http://www.sevenforums.com/tutorials/3413-repair-install.html?ltr=R)
There’s often quite a confusion about the different terms: SSL, TLS, STARTTLS and STLS.
TLS is the new name for SSL. Namely, SSL protocol got to version 3.0; TLS 1.0 is “SSL 3.1”. TLS versions currently defined include TLS 1.1 and 1.2. Each new version adds a few features and modifies some internal details. We sometimes say “SSL/TLS”.
To make the confusing perfect: SSL (secure socket layer) often refers to the old protocol variant which starts with the handshake right away and therefore requires another port for the encrypted protocol such as 443 instead of 80. TLS (transport layer security) often refers to the new variant which allows to start with an unencrypted traditional protocol and then issuing a command (usually STARTTLS) to initialize the handshake
The terms SSL and TLS are often used interchangeably or in conjunction with each other (TLS/SSL), but one is in fact the predecessor of the other — SSL 3.0 served as the basis for TLS 1.0 which, as a result, is sometimes referred to as SSL 3.1.
Which is more Secure SSL or TLS In terms of security they both are consider equally secured
The main difference is that, while SSL connections begin with security and proceed directly to secured communications, TLS connections first begin with an insecure “hello” to the server and only switch to secured communications after the handshake between the client and the server is successful. If the TLS handshake fails for any reason, the connection is never created.
(SSL and TLS vs HTTP)
SSL and TLS are cryptographic protocols, both provide a way to encrypt communication channel between two machines over the Internet (e.g. client computer and a server). SSL stands for Secure Sockets Layer and current version is 3.0. TLS stands for Transport Layer Security and the current version is 1.2. TLS is the successor to SSL. The terms SSL and TLS can be used interchangeably, unless you’re referring to a specific protocol version.
Version numbering is inconsistent between SSL and TLSs. When TLS took over SSL as the preferred protocol name, it began with a new version number. The ordering of protocols in terms of oldest to newest is: SSLv2, SSLv3, TLSv1.0, TLSv1.1, TLSv1.2.
STARTTLS is a protocol command, that is issued by an email
client. It indicates, that the client wants to upgrade existing, insecure
connection to a secure connection using SSL/TLS cryptographic protocol.
STARTTLS command name is used by SMTP and IMAP protocols, whereas POP3 protocol
uses STLS as the command name.
Despite having TLS in the name, STARTTLS doesn’t mean TLS will be used.
Both SSL and TLS are acceptable protocols for securing the communication.
Opportunistic TLS refers to extensions in plain text communication protocols, which offer a way to upgrade a plain text connection to an encrypted (TLS or SSL) connection instead of using a separate port for encrypted communication. Several protocols use a command named “STARTTLS” for this purpose.
TLS is application-neutral; in the words of RFC 5246:
One advantage of TLS is that it is application protocol independent. Higher-level protocols can layer on top of the TLS protocol transparently. The TLS standard, however, does not specify how protocols add security with TLS; the decisions on how to initiate TLS handshaking and how to interpret the authentication certificates exchanged are left to the judgment of the designers and implementors of protocols that run on top of TLS.
The style used to specify how to use TLS matches the same layer distinction that is also conveniently supported by several library implementations of TLS. E.g., the RFC 3207 SMTP extension illustrates with the following dialog how a client and server can start a secure session:[3]
S: <waits for connection on TCP port 25>
C: <opens connection>
S: 220 mail.example.org ESMTP service ready
C: EHLO client.example.org
S: 250-mail.example.org offers a warm hug of welcome
S: 250 STARTTLS
C: STARTTLS
S: 220 Go ahead
C: <starts TLS negotiation>
C & S: <negotiate a TLS session>
C & S: <check result of negotiation>
C: EHLO client.example.org
. . .
The last EHLO command above is issued over a secure channel. Note that authentication is optional in SMTP, and the omitted server reply may now safely advertise an AUTH PLAIN SMTP extension, which is not present in the plain-text reply.
No security protocol is used at all. All commands, responses and data are transferred in plain text.
Implict SSL mode means, that you connect to SSL/TLS encrypted port.
Explicit SSL mode means, that you connect to plaint text port and secure the connection by issuing STARTTLS (or STLS) command afterwards (you explicitly secure the connection).
Regardless of whether you use implict (connecting to an SSL/TLS encrypted port) or explicit (using STARTTLS to upgrade an existing connection) mode, both sides will negotiate which protocol and which version to use. This negotiation is based on how client and server have been configured and what each side supports.
Support for SSL/TLS is virtually universal, however which versions are supported is variable. Pretty much everything supports SSLv3. Most machines support TLSv1.0.
One significant complicating factor is that some email software incorrectly uses the term TLS when they should have used “STARTTLS” or “explicit SSL/TLS”. Older versions of Thunderbird used “TLS” to mean “enforce use of STARTTLS to upgrade the connection, and fail if STARTTLS is not supported” and “TLS, if available” to mean “use STARTTLS to upgrade the connection, if the server advertises support for it, otherwise just use an insecure connection” (very problematic, as we’ll see below).
To add security to some existing protocols (IMAP, POP3, SMTP), it was decided to just add SSL/TLS encryption as a layer underneath the existing protocol. However to distinguish that software should talk the SSL/TLS encrypted version of the protocol rather than the plaintext one, a different port number was used for each protocol:
| Purpose | Normal port, Plain text | SSL variant | SSL port | |
| SMTP | Send email | 25/587 | SMTPS | 465 (legacy) |
| POP3 | Retrieve email | 110 | POP3S | 995 |
| IMAP | Read email | 143 | IMAPS | 993 |
| NNTP | News reader | 119/433 | NNTPS | 563 |
| LDAP | Directory Access | 389 | LDAPS | 636 |
| FTP | File transfer | 21 | FTPS | 990 |
At some point, it was decided that having 2 ports for every protocol was wasteful, and instead it’s better to have 1 port, that starts off as plain text, but clients can upgrade the connection to an SSL/TLS encrypted one using STARTTLS (or STLS for POP3 protocol) command.
There were a few problems with this. There exists lots of software, that used the alternate port numbers with pure SSL/TLS connections. Client software can be very long lived, so you can’t just disable the encrypted ports until all software has been upgraded.
Each protocol received mechanisms to tell clients that the server supported upgrading to SSL/TLS (e.g. STARTTLS in IMAP’s CAPABILITY response), and that they should not attempt to login without doing the STARTTLS upgrade (LOGINDISABLED in IMAP’s CAPABILITY response). This created two unfortunate situations:
Both of these problems resulted in significant compatibility issues with existing clients, and so most system administrators continued to just use plain text connections on one port, and encrypted connections on a separate port number.
Opportunistic TLS is an opportunistic encryption mechanism. Because the initial handshake takes place in plain text, an attacker in control of the network can modify the server messages via a man-in-the-middle attack to make it appear that TLS is unavailable (called a STRIPTLS attack). Most SMTP clients will then send the email and possibly passwords in plain text, often with no notification to the user
Many companies (e.g. Gmail, Outlook.com) disabled plain IMAP (port 143) and plain POP3 (port 110), so people must use a SSL/TLS encrypted connection – this removes the need for having STARTTLS command completely.
The one real exception to the above is SMTP. Most email software used SMTP on port 25 to submit messages to the email server for onward transmission to the destination. However SMTP was originally designed for transfer, not submission. So yet another port (587) was defined for message submission.
Port 587 doesn’t mandate requiring STARTTLS, however the use of port 587 became popular around the same time as the realization that SSL/TLS encryption of communications between clients and servers was an important issue. The result is that most systems, that offer message submission over port 587 require clients to use STARTLS to upgrade the connection. Login and password to authenticate is also required.
There has been an additional benefit to this approach as well. By moving users away from using port 25 for email submission, ISPs can block outgoing port 25 connections from users’ computers, which were a significant source of spam, due to user computers infected with spam sending viruses.
Check at https://noxxi.de/howto/ssl-debugging.html and identify issues!
There are two types of vulnerabilities:
If the exact domain name (FQDN) in the SSL Certificate does not match the domain name displayed in the address bar of the browser
After November 1, 2015, CAs will no longer issue certificates to internal names. Internal names cannot be implicitly validated because they cannot be externally verified.
Certificates that do not contain the necessary fields and values may cause browsers to display warnings.
The current acceptable key strength for an RSA (Rivest-Shamir-Adleman) key is 2048 bits. Certificates must be generated with an RSA key of 2048 bits or higher.
Algorithms once thought of as secure and unbreakable have become either weak or breakable. For example, MD5, RC4, etc
Exhaustive key searches/brute force attacks are a danger to any secure network. As computational power increases, so does the need for stronger keys.
For general SSL checking of a website protocols in use: https://www.ssllabs.com/ssltest/analyze.html or: https://paranoidsecurity.nl/
The easiest way to amend (enable/disable) protocols in use is achieved by a tool called ”IISCripto” at https://www.nartac.com/Products/IISCrypto/
These are the IISCripto tool Features supported:
We’ve been seeing a lot of requests to implement TLS_FALLBACK_SCSV. Unfortunately, it only works if you already have clients that understand it. This article will give some background, discuss TLS downgrades and finally have some suggestions for what you can do now.
Background
Over the years, cryptographers have worked with Internet engineers to improve the Transport Layer Security (TLS) protocol. Each revision of the protocol provides improvements to defend against the latest attacks devised by the cryptographers.
In 2011, Thai Duong and Juliano Rizzo demonstrated a proof-of-concept for attacks against the way SSL/TLS use the Cipher Block Chaining (CBC) mode of encryption. Their paper introduced the Browser Exploit Against SSL/TLS (BEAST) and used it to demonstrate how a “man-in-the-middle” (MITM) with the ability to run Javascript on the victim client could generate many thousands of TLS sessions and eventually recover a session cookie.
The defense against the BEAST attack was included in TLS 1.1, but few web servers or clients migrated right away.
POODLE is a similar attack to BEAST, but works against SSLv3 due to the special structure of the padding in SSLv3. Part of the POODLE attack is a downgrade to SSLv3.
TLS Downgrades
TLS agents should negotiate the highest version of the protocol supported by client and server. Clients advertise the highest version of the protocol they support. The server selects the highest version it supports, and sends the negotiated version number in the ServerHello message.
Many broken TLS implementations in widespread use were unable to cope with versions they did not understand. This caused large numbers of TLS sessions to break during the TLS 1.1 rollout.
The browser vendors implemented a downgrade mechanism. Immediately after a session fails during the initial handshake, the browser will retry, but attempt a max version one lower than before. After attempting to connect to a server with the max version set to TLS1.1, the client would retry with the max version set to TLS1.0.
Security researchers love automatic downgrades because they get to attack older protocols instead of newer, more secure protocols. A MITM attacker can break client connections during the initial TLS handshake, triggering a downgrade all the way to SSLv3.
Bodo Möller and Adam Langley devised Signaling Cipher Suite Value (SCSV) ,TLS_FALLBACK_SCSV, so the client can inform the server of a downgraded connection. It indicates to the server that the client had previously attempted to connect using a higher max protocol version, but the session was broken off before the initial handshake could be completed.
If the server sees the SCSV, and if it could have negotiated a protocol version higher than what the client is currently announcing as its maximum, the server must break the connection.
On October 21, Möller and Langley presented to members of the IETF TLS Working Group to lay out their rationale and argue for inclusion of the TLS_FALLBACK_SCSV draft in the upcoming revision to TLS.
The key points to their argument are presented on page 3:
Ideally, stop doing downgrade retries
If that’s not practical, clients should add TLS_FALLBACK_SCSV to ClientHello.cipher_suites in fallback retries
Servers that detect TLS_FALLBACK_SCSV will reject the connection if ClientHello.client_version is a downgrade
Möller and Langley implemented TLS_FALLBACK_SCSV in Chrome, Firefox, and Google servers earlier in 2014. During the past several months, they’ve had an opportunity to confirm that it allows SSLv3 connections only in cases where that is truly the highest common protocol version.
On October 15, OpenSSL for the first time integrated TLS_FALLBACK_SCSV code.
Upgrade your clients
The best protection against POODLE is to disable SSLv3. That is not always possible because of legacy clients. Unfortunately, TLS_FALLBACK_SCSV requires both clients and servers to implement it. Legacy clients will not send TLS_FALLBACK_SCSV. You must update the clients to newer code to get all the advantages of TLS_FALLBACK_SCSV.
If you can update all your clients to code that supports TLS1.x, then you can successfully disable SSLv3 from your BIG-IPs using either method described earlier.
If you can’t upgrade your clients, you can avoid POODLE by using SSL3’s RC4 stream cipher instead of a block cipher with CBC. Be aware that there are known weaknesses in RC4.
Protocols:
Ciphers:
In our previous post, we discussed POODLE and legacy SSLv3 clients.
The best solution to POODLE is to disable SSLv3.
However, SSLv3 often can’t be disabled because legacy clients only speak SSLv3.
F5’s security teams have done some investigation, and we believe that using the RC4 can be used as POODLE mitigation for those legacy clients. RC4 is a stream cipher and is not vulnerable to the POODLE attack.
RC4 does have a known weakness. After hundreds of millions of messages, an attacker could recover the plaintext.
POODLE can recover information after only tens of thousands of attacks.
So even though RC4 is not recommended as a cipher, it remains more secure to use in SSLv3 sessions than AES-CBC.
If you cannot disable SSLv3, you may enable RC4-SHA only for use in SSLv3 sessions until you are able to replace all the legacy clients.
To configure your virtual server to only allow SSLv3 RC4-SHA, use a cipher string like the following:
“default:-RC4:-SSLv3:SSLv3+RC4-SHA”
“Default” sets the default ciphers, “-RC4″ removes any ciphers that contain RC4 (this is optional). “-SSLv3” removes any SSLv3 ciphers, but “SSLv3+RC4-SHA” re-enables only the RC4-SHA cipher from SSLv3. Any client connecting via SSL3 will be forced to use RC4 rather than a CBC cipher that is vulnerable to POODLE.
See SOL 13171 for information on setting your cipher string.
There are known attacks against RC4 that are better than brute-force. But given POODLE, RC4 is the most secure SSLv3 cipher.
It is still recommended to disable SSLv3 and RC4 once you are able to remove all legacy clients.
At the time we had an internal debate about turning off RC4 altogether, but statistics showed that we couldn’t. Although only a tiny percentage of web browsers hitting CloudFlare’s network needed RC4 that’s still thousands of people contacting web sites that use our service.
To understand who needs RC4 I delved into our live logging system and extracted the User-Agent and country the visitor was coming from. In total, roughly 0.000002% of requests to CloudFlare use the RC4 protocol. It’s a small number, but it’s significant enough we believe we need to continue to support it for our customers.
Requests to CloudFlare sites that are still using RC4 fall into four main categories: people passing through proxies, older phones (often candy bar), other (more on that below) and a bucket of miscellaneous (like software checking for updates, old email programs and ancient operating systems).

Ciphers
Examining data for a 59 hour period last week showed that 34.4% of RC4-based requests used RC4-SHA and 63.6% used ECDHE-RSA-RC4-SHA. RC4-SHA is the oldest of those; ECDHE-RSA-RC4-SHA uses a newer elliptic curve based method of establishing an SSL connection. Either way, they both use the RC4 encryption algorithm to secure data sent across the SSL connection. We’d like to stop supporting RC4 altogether, because it is no longer believed to be secure, but continue to offer it for the small number of clients who can’t connect more securely.
If you ever need to know the details of an SSL cipher you can use the openssl ciphers command:
$ openssl ciphers -tls1 -v RC4-SHA
RC4-SHA SSLv3 Kx=RSA Au=RSA Enc=RC4(128) Mac=SHA1
which shows that RC4-SHA uses RSA for key exchange, RSA for authentication, RC4 (128-bit) for encryption and SHA1 for message authentication.
Similarly,
$ openssl ciphers -tls1 -v ECDHE-RSA-RC4-SHA
ECDHE-RSA-RC4-SHA SSLv3 Kx=ECDH Au=RSA Enc=RC4(128) Mac=SHA1
shows that the same encryption, authentication and message authenitication are used as RC4-SHA but the key exchange is made using Elliptic Curve Diffie Hellman.
Inside RC4
One of the reasons RC4 is used for encryption is its speed. RC4 is a very fast encryption algorithm and it can be easily implemented on a wide variety of hardware (including phones with slow processors and even on 8-bit systems like the Arduino). After all, RC4 dates back to 1987.
The core of RC4 is the following algorithm:
i := 0
j := 0
while GeneratingOutput:
i := (i + 1) mod 256
j := (j + S[i]) mod 256
swap values of S[i] and S[j]
K := S[(S[i] + S[j]) mod 256]
output K
endwhile
It generates a pseudo-random stream of numbers (all 8-bit numbers in the range 0 to 255) by doing simple lookups in a table, swapping of values and addition modulo 256 (which is very, very fast). The output of that algorithm is usually combined with the message to be encrypted byte-by-byte using some fast scheme like an XOR.
The following short video shows the RC4 algorithm in action. It’s been restricted to 32 values rather than 256 to fit it nicely on the screen but the algorithm is identical. The red stream of numbers at the bottom shows the pseudo-random stream output by the algorithm. (The code for this animation is available here; thanks to @AntoineGrondin for making the animated GIF).

So, RC4 is fast, but who’s still using it? To answer that I looked at the HTTP User-Agent reported by the device connecting to CloudFlare. There were 292 unique User-Agents.
Who still uses RC4?
Firstly, lots of people using older “candy bar” style phones. Phones like the Nokia 6120 classic which was released in 2007 (and is the phone with the greatest number of RC4 requests to CloudFlare sites: 4% of the RC4-based requests in the measurement period), the Lemon T109 or the Sony Ericcson K310 which was released in 2006.
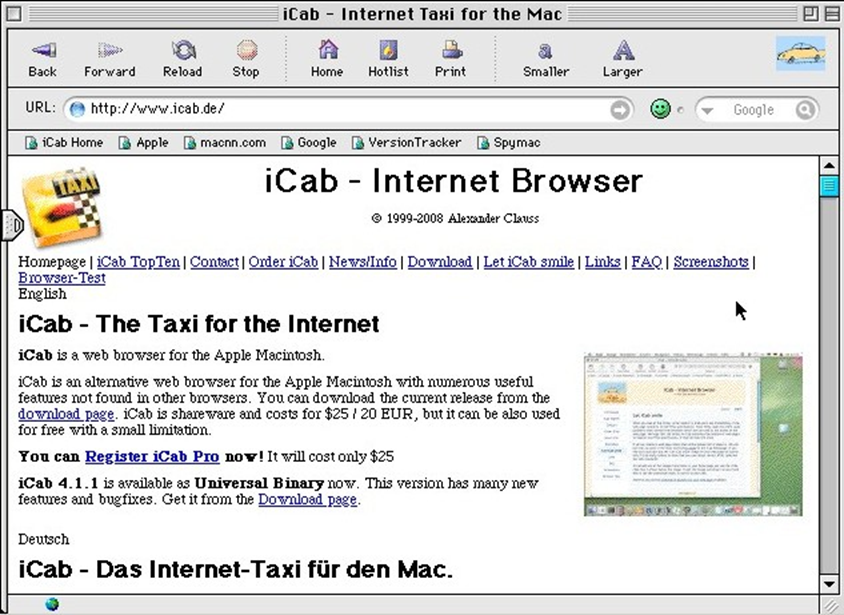
And, of course, it’s not all older telephones being used to visit CloudFlare-powered web sites. There are old browsers too. For example, we’ve seen the now ancient iCab 2.9.9 web browser (it was released in 2006) and we’ve seen it being used running on a 68k based Macintosh (last sold by Apple in 1996).
Another source of RC4-only connections is older versions of Adobe AIR. AIR is often used for games and if users don’t update the AIR runtime they can end up using the older RC4 cipher.
Yet another source is stand-alone software that makes its own SSL connection. We’ve seen some software checking update servers using RC4-secured connections. The software makes a connection to its own update server using HTTPS but the available ciphers are limited and RC4 is chosen. The command-line program curl was used to generate 1.9% of RC4-based requests to CloudFlare sites (all done with versions dating to 2009).
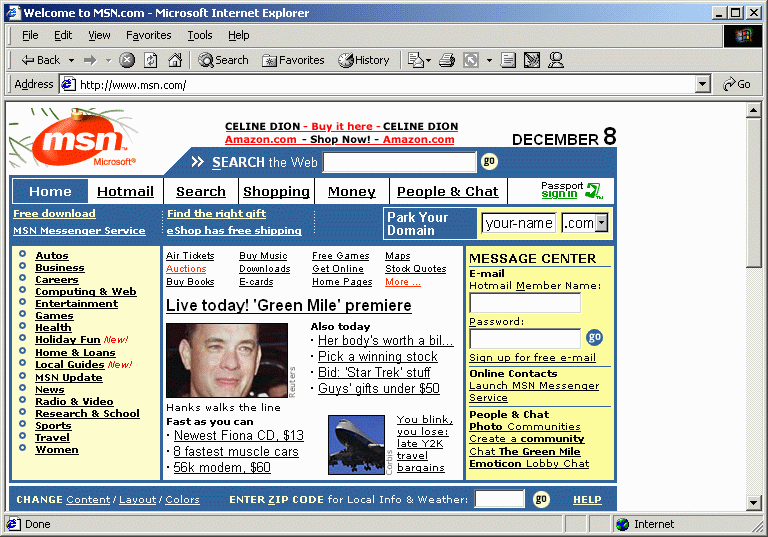
There’s also quite a bit of older Microsoft Internet Explorer around including Internet Explorer 5.01 (which dates back to 1999!). Here’s a breakdown of Internet Explorer versions connecting using RC4:

Looking at Windows tells a similar story of older version of the operating system (except for the presence of Windows 7 which is explained below) with lots of Windows XP out there:

I sampled connections using RC4 to see which countries they came from. The following mapping shows the distribution of RC4-based connections across the world (the darker the more RC4 was used).

From the map you can see that in Brazil, India, and across central Africa RC4 is still being used quite widely. But you’ll also notice that the coloring of the US indicates that a lot of RC4 is in use there. That seems like a surprise, and there’s an extra surprise.
Transparent SSL Proxies
Digging into the User-Agent data for the US we see the following web browser being used to access CloudFlare-powered sites using RC4:
Mozilla/5.0 (Windows NT 6.1; WOW64) AppleWebKit/537.36 (KHTML, like Gecko)
Chrome/34.0.1847.137 Safari/537.36
That’s the most recent version of Google Chrome running on Windows 7 (you can see the presence in Windows 7 in the chart above). That should not be using RC4. In fact, most of the connections from Windows machines that we see using RC4 should not be (since we prioritize 3DES over RC4 for older machines).
It was initially unclear why this was happening until we looked at where the connections were coming from. They were concentrated in the US and Brazil and most seemed to be coming from IP addresses used by schools, hospitals and other large institutions.
Although the desktop machines in these locations have recent Windows and up to date browsers (which will not use RC4) the networks they are on are using SSL-based VPNs or firewalls that are performing man-in-the-middle monitoring of SSL connections.
This enables them to filter out undesirable sites, even those that are accessed using HTTPS, but it appears that the VPN/firewall software is using older cipher suites. That software likely needs updating to stop it using RC4 for secure connections.
What you can do
You can check the strength of your browser’s SSL configuration by visiting How’s My SSL. If you get a rating of “Probably Okay” then you’re good. If not make sure you have the latest browser version.
Block-based cipher suites are vulnerable to the BEAST attack. Older versions of the TLS protocol (1.0) and the SSL protocol (2.0 and 3.0) are vulnerable to the BEAST attack. To fix it you need to:
– Enable TLS 1.1 and/or TLS 1.2 on servers that support TLS 1.1 and 1.2.
– Enable TLS 1.1 and/or TLS 1.2 in Web browsers that support TLS 1.1 and 1.2.
BREACH attacks are similar to the CRIME attack. Known as CVE-2013-3587, or Browser Reconnaissance and Exfiltration via Adaptive Compression of Hypertext (BREACH) is an instance of CRIME against HTTP Compression. That is to say that CRIME attacked TLS SPDY whereas BREACH targets HTTP gzip/DEFLATE. Therefore turning off the TLS compression has no affect on BREACH as it exploits the underlying HTTP compression. The attack follows the basic steps of the CRIME attack and there are several methods to remediate the issue, such as disabling HTTP compression, protecting the application from CSRF attacks, randomising CSRF tokens per request to prevent them being captured, obfuscating the length of page responses by adding random amounts of arbitrary bytes to the response.
Web Server: Turn off compression for pages that include PII (Personally Identifiable Information).
Web Browser: Force browser not to invite HTTP compression use.
Web Applications:
– Consider moving to Cipher AES128.
– Remove compression support on dynamic content.
– Reduce secrets in response buddies.
– Use rate-limiting requests.
The Transport Layer Security (TLS) protocol contains a feature that allows you to compress the data passed between the server and the Web browser. TLS data compression is susceptible to the CRIME exploit. CRIME targets cookies over connections that use HTTPS protocol (Hyper Text Transfer Protocol with Secure Sockets Layer) and SPDY protocol (Web protocol from Google), which employ TLS data compression.
In a CRIME attack, the attacker recovers the content of secret authentication cookies and uses this information to hijack an authenticated web session. The attacker uses a combination of plaintext injection and TLS compression data leakage to exploit the vulnerability. The attacker lures the Web browser to make several connections to the website. The attacker than compares the size of the ciphertexts sent by the browser during each exchange to determine parts of the encrypted communication and hijack the session.
If you are vulnerable to the CRIME attack, the highest grade you can receive is a C. To resolve it:
– Disable server (website) TLS data compression and Web browser TLS data compression.
– Modify gzip to allow for explicit separation of compression contexts in SPDY.
A team of researchers revealed that the old export-grade cryptographic suites are still being used today. Servers that support RSA export cipher suites could allow a man-in-the-middle (MITM) to trick clients, who support the weak cipher suites, into using these weak 40- and/or 56-bit export cipher suites to downgrade their connection. The MITM can then use today’s computing power to crack those keys in just a few hours.
To fall into this attack:
Server: The server must support RSA export cipher suites.
AND
Client: The client must do one of the following: (1) must offer an RSA export suite, or (2) must be using Apple SecureTransport, or (3) must be using a vulnerable version of OpenSSL, or (4) must be using Secure Channel (Schannel).
To fix it:
Server-Side: Disable support for all export-grade cipher suites on your servers. We also recommend that you disable support for all known insecure ciphers (not just RSA export ciphers), disable support for ciphers with 40- and 56-bit encryption, and enable forward secrecy.
Client-Side: Vulnerable clients include software that rely on OpenSSL or Apple’s Secure Transport (i.e., Chrome, Safari, Opera, the Android and the BlackBerry stock browsers), or Windows Secure Channel/Schannel (i.e. Internet Explorer). FREAK vulnerability patched in latest OpenSSL Release.
The cryptographic libraries in OpenSSL versions 1.0.1 through 1.0.1f and 1.0.2-beta1 are vulnerable to the Heartbleed Bug attack.
Solution is to Patch your software. Upgrade to the latest version of OpenSSL (version 1.0.1g or later).
The Secure Socket Layer (SSL)/Transport Layer Security (TLS) protocol contains a session renegotiation feature that permits a server and client to use their connection to establish new parameters and generate new keys during the session.
To fix it: Make sure your servers support secure negotiations by running current versions of the SSL/TLS protocol. Servers should not be running SSL 2.0, an outdated version of SSL that has known vulnerabilities.
Researchers found that old DHE export-grade cryptographic suites are still being used. They also discovered that servers with support for these DHE_EXPORT cipher suites enabled could allow a man-in-the-middle (MITM) to trick clients that support the weak DHE_EXPORT cipher suites into downgrading their connection to a 512-bit key exchange.
To fix it:
– Disable support for all DHE_EXPORT cipher suites on your servers.
– Generate a strong Diffie-Hellman Parameter, minimum 2048-bits.
BlueKeep (CVE-2019-0708) is a security vulnerability that was discovered in Microsoft’s Remote Desktop Protocol, which allows for the possibility of remote code execution. Identified May2019
Then few weeks later further flaws in RDP were found – (CVE-2019-1181 and CVE-2019-1182)
The RDP protocol uses “virtual channels”, configured pre-authentication, as a data path between the client and server for providing extensions. RDP 5.1 defines 32 “static” virtual channels, and “dynamic” virtual channels are contained within one of these static channels. If a server binds the virtual channel “MS_T120” (a channel for which there is no legitimate reason for a client to connect to) with a static channel other than 31, heap corruption occurs that allows for arbitrary code execution at the system level
How to Prevent and Fix BlueKeep
To fix it: KEEP CALM AND START PATCHING – DO NOT RUSH but plan for it!
Permit me to remind you that BlueKeep itself hasn’t been reliably exploited. The threat is real, but it’s not viral or immediate.
Microsoft released patches for the vulnerability on 14 May 2019m valid up to WS2012
First, focus on patching externally facing RDP servers, then move on to critical servers such as domain controllers and management servers. Finally patch non-critical servers that have RDP enabled, along with the rest of the desktop estate. You can find more information on applying the patch from Microsoft’s support pages
The BEAST attack was discovered in 2011. The solution to mitigating the attack is to enable TLS 1.1 and TLS 1.2 on servers and in browsers. Because RC4 is easy to implement and because of the BEAST attack workaround, the RC4 stream cipher’s use is widespread. One estimate says that RC4 may account for up to 50% of all TLS traffic. (back in 2014)
To fix it:
– Enable TLS 1.2 on servers that support TLS 1.2 and switch to AEAD cipher suites (i.e. AES-GCM).
– Enable TLS 1.2 in browsers that support TLS 1.2.
“SSL 2.0 is an outdated protocol version with known vulnerabilities.”
SSL 2.0 protocol was disavowed in 1996 due to known security flaws, some servers are still using it. Servers still using the SSL 2.0 protocol should disable it.
While the SSL 3.0 protocol is enabled, a MITM (man-in-middle-attack) can intercept encrypted connections and calculate the plaintext of the intercepted connections.
The most effective way to counter the POODLE attack is to disable the SSL 3.0 protocol.
Disable the SSL 3.0 protocol on the server and enable TLS1.1, and TLS1.2.
It’s Time to Disable TLS 1.0 (2019 onwards). Unless you need to support legacy browsers, you should also disable TLS 1.0 and TLS 1.1
Microsoft recommends customers get ahead of this issue by removing TLS 1.0 dependencies in their environments and disabling TLS 1.0 at the operating system level where possible (More details at https://docs.microsoft.com/en-us/security/solving-tls1-problem)
If you disable TLS 1.0 and TLS 1.1, the following user agents and their older versions will likely be affected (specific user agent versions on different operating systems may vary).
Use Secure Protocols – TLS 1.1/1.2/1.3
Use at least 2048-Bit Private Keys
Protect Private Keys
Ensure Sufficient Hostname Coverage
Obtain Certificates from a Reliable CA
Use Strong Certificate Signature Algorithms – SHA256
Use Complete Certificate Chains
Use Secure Cipher Suites:
Select Best Cipher Suites
Use Forward Secrecy
Use Strong Key Exchange
Mitigate Known Problems
Use Session Resumption – a performance-optimization technique
Avoid Too Much Security
Use WAN Optimization and HTTP/2
Cache Public Content
Use OCSP Stapling
Use Fast Cryptographic Primitives
HTTP and Application Security
Encrypt Everything
Eliminate Mixed Content
Understand and Acknowledge Third-Party Trust
Use Secure Cookies – Secure Cookie responce header
Secure HTTP Compression
Deploy HTTP Strict Transport Security – HSTS responce header
Deploy Content Security Policy – CSP header
Do Not Cache Sensitive Content
Consider Other Threats
Public Key Pinning (advanced)
DNSSEC and DANE (advanced)
| BROWSERS | TLS 1.0 | TLS 1.1 | TLS 1.2 | TLS 1.3 |
| Mobile IE version 10 and below | ✓ | ✗ | ✗ | ✗ |
| Desktop IE versions 7 and below | ✓ | ✗ | ✗ | ✗ |
| Desktop IE versions: 8, 9, and 10 | ✓ | Partial | Partial | ✗ |
| Desktop and mobile IE version 11 | ✓ | ✓ | ✓ | ✗ |
| Microsoft Edge | ✓ | ✓ | ✓ | ✗ |
| Mozilla Firefox 22 and below | ✓ | ✗ | ✗ | ✗ |
| Mozilla Firefox 23 to 26 | ✓ | Partial | Partial | ✗ |
| Mozilla Firefox 27 and higher | ✓ | ✓ | ✓ | ✗ |
| Google Chrome 21 and below | ✓ | ✗ | ✗ | ✗ |
| Google Chrome 22 to 37 | ✓ | Partial | Partial | ✗ |
| Google Chrome 38 and higher | ✓ | ✓ | ✓ | ✗ |
| Android 4.3 (Jelly Bean) and below | ✓ | ✗ | ✗ | ✗ |
| Android 4.4 (Kitkat) to 4.4.4 | ✓ | Partial | Partial | ✗ |
| Android 5.0 (Lollipop) and higher | ✓ | ✓ | ✓ | ✗ |
| Mobile Safari for iOS 4 and below | ✓ | ✗ | ✗ | ✗ |
| Mobile Safari versions 5 and higher for iOS 5 and higher | ✓ | ✓ | ✓ | ✗ |
| Desktop Safari versions 6 for OS X 10.8 (Mountain Lion) | ✓ | ✗ | ✗ | ✗ |
| Desktop Safari versions 7+ for OS X 10.9 (Mavericks)+ | ✓ | ✓ | ✓ | ✗ |
| Desktop Clients | TLS 1.0 | TLS 1.1 | TLS 1.2 | TLS 1.3 |
| Windows XP | ✓ | ✗ | ✗ | ✗ |
| Windows XP SP3 | ✓ | ✓ | ✗ | ✗ |
| Windows Vista | ✓ | ✗ | ✗ | ✗ |
| Windows 7 SP1 | ✓ | ✓ | ✓ | ✗ |
| Windows 8 | ✓ | Partial | Partial | ✗ |
| Windows 8.1 | ✓ | ✓ | ✓ | ✗ |
| Windows 10 | ✓ | ✓ | ✓ | ✗ |
| MAC OS X 10.2 and 10.3 | ✓ | ✗ | ✗ | ✗ |
| MAC OS X 10.4 and 10.5 | ✓ | ✗ | ✗ | ✗ |
| MAC OS X 10.6 and 10.7 | ✓ | ✗ | ✗ | ✗ |
| MAC OS X 10.8 | ✓ | ✗ | ✗ | ✗ |
| MAC OS X 10.9 | ✓ | ✓ | ✓ | ✗ |
| MAC OS X 10.10 | ✓ | ✓ | ✓ | ✗ |
| MAC OS X 10.11 | ✓ | ✓ | ✓ | ✗ |
| MAC OS X 10.12 | ✓ | ✓ | ✓ | ✗ |
| MAC OS X 10.13 | ✓ | ✓ | ✓ | ✗ |
| Linux | ✓ | ✗ | ✗ | ✗ |
| Mobile Clients | TLS 1.0 | TLS 1.1 | TLS 1.2 | TLS 1.3 |
| Airwatch | ✓ | ✓ | Partial | ✗ |
| Android versions: 1.0 to 4.4.4 | ✓ | ✗ | ✗ | ✗ |
| Android versions: 5.0 to 8.1 and Android P | ✓ | ✓ | ✓ | ✗ |
| iPhone OS versions: 1, 2, 3, and 4 | ✓ | ✗ | ✗ | ✗ |
| iPhone OS versions: 5, 6, 7, 8, 9, 10, and 11 | ✓ | ✓ | ✓ | ✗ |
| MobileIron Core versions 9.4 and below | ✓ | ✗ | ✗ | ✗ |
| MobileIron Core versions 9.5 and higher | ✓ | ✓ | ✓ | ✗ |
| MobileIron Cloud | ✓ | ✓ | ✓ | ✗ |
| Windows Phone versions: 7, 7.5, 7.8 and 8 | ✓ | ✗ | ✗ | ✗ |
| Windows Phone version 8.1 | ✓ | ✓ | ✓ | ✗ |
| Windows 10 Mobile versions: v1511, v1607, v1703, and v1709 | ✓ | ✓ | ✓ | ✗ |
| Servers | TLS 1.0 | TLS 1.1 | TLS 1.2 | TLS 1.3 |
| Windows Server 2003 | ✓ | ✗ | ✗ | ✗ |
| Windows Server 2008 | ✓ | ✗ | ✗ | ✗ |
| Windows Server 2008 R2 | ✓ | ✓ | ✓ | ✗ |
| Windows Server 2012 | ✓ | Partial | Partial | ✗ |
| Windows Server 2012 R2 | ✓ | ✓ | ✓ | ✗ |
| Windows Server 2016 | ✓ | ✓ | ✓ | ✗ |
| Libraries | TLS 1.0 | TLS 1.1 | TLS 1.2 | TLS 1.3 |
| .NET 4.6 and higher | ✓ | ✓ | ✓ | ✗ |
| .NET 4.5 to 4.5.2 | ✓ | Partial | Partial | ✗ |
| .NET 4.0 | ✓ | ✓ | Partial | ✗ |
| .NET 3.5 and below | ✓ | ✗ | ✗ | ✗ |
| OpenSSL versions: 1.0.0 and below | ✓ | ✗ | ✗ | ✗ |
| OpenSSL versions: 1.0.1 and higher | ✓ | ✓ | ✓ | ✗ |
| Mozilla – NSS versions: 3.13.6 and below | ✓ | ✗ | ✗ | ✗ |
| Mozilla – NSS versions: 3.14 to 3.15 | ✓ | ✓ | ✗ | ✗ |
| Mozilla – NSS versions: 3.15.1 and higher | ✓ | ✓ | ✓ | ✗ |
Links:
https://www.gracefulsecurity.com/tls-ssl-vulnerabilities/
https://www.acunetix.com/blog/articles/tls-vulnerabilities-attacks-final-part/
https://www.acunetix.com/blog/articles/tls-ssl-cipher-hardening/
https://support.globalsign.com/customer/portal/articles/2934392-tls-protocol-compatibility
https://www.ssl.com/article/tls-1-3-is-here-to-stay/
Cases when is TLS1.0 is (needs to be) disabled:
• Systems compliance with PCI-DSS 3.1 which requires TLS 1.0 to be disabled.
• replicating clients environment using TLS.1.1 and TLS 1.2 only
• demanded by the PCI compliance community
What is PCI:
The Payment Card Industry Data Security Standard (PCI DSS) is a set of security standards designed to ensure that ALL companies that accept, process, store or transmit credit card information maintain a secure environment.
Solution: Microsoft released the patch for this problem on Sep 15, 2015
Download: https://support.microsoft.com/en-us/kb/3080079
Verify TLS state : Use GUI tool IIS Crypto 3.0 at IIS Crypto Tool from Nartac Software: https://www.nartac.com/Products/IISCrypto/
Notes:
1. “When Enhanced RDP Security is used, RDP traffic is no longer protected by using the techniques
described in section 5.3. Instead, all security operations (such as encryption and decryption, data
integrity checks, and Server Authentication) are implemented by one of the following External
Security Protocols:
TLS 1.0 (see [RFC2246])
TLS 1.1 (see [RFC4346])
TLS 1.2 (see [RFC5246])
CredSSP (see [MS-CSSP])”
2.” TLS 1.1 is not supported by Windows NT, Windows 2000 Server, Windows XP,
Windows Server 2003, Windows Vista and Windows Server 2008.
3. TLS 1.2 is not supported by Windows NT, Windows 2000 Server, Windows XP,
Windows Server 2003, Windows Vista, and Windows Server 2008″
| Link | Description | Note |
| https://www.coindesk.com/ | Coindesk | |
| https://www.bitcoin.com/ | Bitcoin.com | |
| https://cointelegraph.com/tags/bitcoin | CoinTelegraph | |
| https://www.ccn.com/ | CCN | |
| https://bitcoinist.com/ | Bitcoinist | |
| https://www.newsbtc.com/ | NewsBTC | |
| https://ethereumworldnews.com/ | Crypto news | |
| https://www.dailyfx.com/bitcoin | Daily FX | |
| https://masterthecrypto.com/ | ||
| Link | Description | Note |
| https://coinmarketcap.com/ | Market Capitalisation | |
| https://coin360.com/ | Market Cap and wedges | |
| https://bitinfocharts.com/ | Crypto Charts | |
| https://bitcointicker.co/ | Ticker stats | |
| https://www.blockchain.com/en/stats | BitcoinStats | |
| https://coin.dance/stats | Coin Dance, graphs and chart | |
| https://www.cryptocompare.com/ | CryptoCompare | |
| https://btc.com/stats | BTC stats | Most private search engine |
| https://blockchair.com/compare | Blockchair | |
| https://charts.bitcoin.com/btc/ | Price charts | |
| Link | Description | Note |
| https://dickline.info/ | McAfee predicton tool to 1million | |
| https://99bitcoins.com/bitcoin-obituaries/ | Bitcoin Ongoing Obituaries | |
| Link | Description |
| https://www.coinbase.com/ | Coinbase |
| https://shapeshift.io/#/coins | Shapeshift |
| Links | Description |
| https://www.bitmex.com/ | Bitmex |
| https://www.binance.com/en | Binance |
| https://www.kraken.com/ | Kraken |
| https://shapeshift.io/#/coins | Shapeshift converts |
| https://www.etoro.com/markets/btc/stats | Etoro, social trading |
| https://international.bittrex.com/ | Bittrex |
| https://www.etoro.com/markets/btc | Etoro – Social Trading Exchange (no crypto cashout) |
| Links | Description |
| https://twitter.com/hashtag/bitcoin?lang=en | #bitcoin |
| https://twitter.com/hashtag/crypto?lang=en | #crypto |
| https://twitter.com/coinmetrics | Coinmetrics.com Twitter chanel |
With CSS, colors can be set by using
color names:
|
Color |
Name |
|
|
Red |
|
|
Yellow |
|
|
Cyan |
|
|
Blue |
|
|
Magenta |
With CSS, colors can be specified in different ways:
RGB color values are supported in all browsers.
An RGB color value is specified with: rgb ( RED , GREEN , BLUE)
Each parameter defines the intensity of the color as an integer between 0
and 255. For example, rgb(0,0,255) is rendered as blue, because the blue parameter is
set to its highest value (255) and the others are set to 0.
|
Color |
RGB |
Color |
|
|
rgb(255,0,0) |
Red |
|
|
rgb(0,255,0) |
Green |
|
|
rgb(0,0,255) |
Blue |
Hexadecimal color values are also supported in all browsers.
A hexadecimal color is specified with: #RRGGBB.
RR (red), GG (green) and BB (blue) are hexadecimal integers between 00 and FF specifying the intensity of the color. For example, #0000FF is displayed as blue, because the blue component is set to its highest value (FF) and the others are set to 00.
|
Color |
HEX |
RGB |
Color |
|
|
#FF0000 |
rgb(255,0,0) |
Red |
|
|
#00FF00 |
rgb(0,255,0) |
Green |
|
|
#0000FF |
rgb(0,0,255) |
Blue |
Shades of gray are often defined using equal values for all the 3 light sources:
|
Color |
HEX |
RGB |
Color |
|
|
#000000 |
rgb(0,0,0) |
Black |
|
|
#808080 |
rgb(128,128,128) |
Gray |
|
|
#FFFFFF |
rgb(255,255,255) |
White |
All modern browsers support the following 140 color names (click on a color name, or a hex value, to view the color as the background-color along with different text colors):
SORTED BY NAME
|
Sorted by HEX
|
All modern browsers support the following 140 color names (click on a color
name, or a hex value, to view the color as the background-color along with different
text colors):
|
Color Name |
HEX |
Color |
|
|
||
|
|
||
|
|
||
|
|
||
|
|
||
|
Color Name |
HEX |
Color |
|
|
||
|
|
||
|
|
||
|
|
||
|
|
||
|
|
||
|
|
||
|
|
||
|
|
||
|
|
||
|
|
||
|
|
||
|
|
||
|
|
||
|
|
||
|
|
||
|
|
||
|
|
||
|
|
||
|
Color Name |
HEX |
Color |
|
|
||
|
|
||
|
|
||
|
|
||
|
|
||
|
|
||
|
|
||
|
|
||
|
|
||
|
Color Name |
HEX |
Color |
|
|
||
|
|
||
|
|
||
|
|
||
|
|
||
|
Color Name |
HEX |
Color |
|
|
||
|
|
||
|
|
||
|
|
||
|
|
||
|
|
||
|
|
||
|
|
||
|
|
||
|
|
||
|
|
||
|
Color Name |
HEX |
Color |
|
|
||
|
|
||
|
|
||
|
|
||
|
|
||
|
|
||
|
|
||
|
|
||
|
|
||
|
|
||
|
|
||
|
|
||
|
|
||
|
|
||
|
|
||
|
|
||
|
|
||
|
|
||
|
|
||
|
|
||
|
|
||
|
|
||
|
Color Name |
HEX |
Color |
|
|
||
|
|
||
|
|
||
|
|
||
|
|
||
|
|
||
|
|
||
|
|
||
|
Color Name |
HEX |
Color |
|
|
||
|
|
||
|
|
||
|
|
||
|
|
||
|
|
||
|
|
||
|
|
||
|
|
||
|
|
||
|
|
||
|
|
||
|
|
||
|
|
||
|
|
||
|
|
||
|
Color Name |
HEX |
Color |
|
|
||
|
|
||
|
|
||
|
|
||
|
|
||
|
|
||
|
|
||
|
|
||
|
|
||
|
|
||
|
|
||
|
|
||
|
|
||
|
|
||
|
|
||
|
|
||
|
|
||
|
|
||
|
Color Name |
HEX |
Color |
|
|
||
|
|
||
|
|
||
|
|
||
|
|
||
|
|
||
|
|
||
|
|
||
|
|
||
|
|
||
|
|
||
|
|
||
|
|
||
|
|
||
|
|
||
|
|
||
|
|
||
|
Color Name |
HEX |
Color |
|
|
||
|
|
||
|
|
||
|
|
||
|
|
||
|
|
||
|
|
||
|
|
||
|
|
||
|
|
Gray colors are displayed using an equal amount of power to all of the light sources. To make it easy for you to select a gray color we have compiled a table of gray shades for you:
|
Gray Shades |
HEX |
RGB |
|
HTML Black |
#000000 |
rgb(0,0,0) |
|
#080808 |
rgb(8,8,8) |
|
|
#101010 |
rgb(16,16,16) |
|
|
#181818 |
rgb(24,24,24) |
|
|
#202020 |
rgb(32,32,32) |
|
|
#282828 |
rgb(40,40,40) |
|
|
#303030 |
rgb(48,48,48) |
|
|
#383838 |
rgb(56,56,56) |
|
|
#404040 |
rgb(64,64,64) |
|
|
#484848 |
rgb(72,72,72) |
|
|
#505050 |
rgb(80,80,80) |
|
|
#585858 |
rgb(88,88,88) |
|
|
#606060 |
rgb(96,96,96) |
|
|
#686868 |
rgb(104,104,104) |
|
|
#696969 |
rgb(105,105,105) |
|
|
#707070 |
rgb(112,112,112) |
|
|
#787878 |
rgb(120,120,120) |
|
|
HTML Gray |
#808080 |
rgb(128,128,128) |
|
#888888 |
rgb(136,136,136) |
|
|
#909090 |
rgb(144,144,144) |
|
|
#989898 |
rgb(152,152,152) |
|
|
#A0A0A0 |
rgb(160,160,160) |
|
|
#A8A8A8 |
rgb(168,168,168) |
|
|
HTML DarkGray !!! |
#A9A9A9 |
rgb(169,169,169) |
|
#B0B0B0 |
rgb(176,176,176) |
|
|
#B8B8B8 |
rgb(184,184,184) |
|
|
X11 Gray |
#BEBEBE |
rgb(190,190,190) |
|
HTML Silver |
#C0C0C0 |
rgb(192,192,192) |
|
#C8C8C8 |
rgb(200,200,200) |
|
|
#D0D0D0 |
rgb(208,208,208) |
|
|
HTML LightGray |
#D3D3D3 |
rgb(211,211,211) |
|
#D8D8D8 |
rgb(216,216,216) |
|
|
HTML Gainsboro |
#DCDCDC |
rgb(220,220,220) |
|
#E0E0E0 |
rgb(224,224,224) |
|
|
#E8E8E8 |
rgb(232,232,232) |
|
|
#F0F0F0 |
rgb(240,240,240) |
|
|
HTML WhiteSmoke |
#F5F5F5 |
rgb(245,245,245) |
|
#F8F8F8 |
rgb(248,248,248) |
|
|
HTML White |
#FFFFFF |
rgb(255,255,255) |
An anomaly in the table above is that HTML Gray is darker than DarkGray. The color names of HTML / CSS was inherited from the X11 standard. HTML /CSS defined gray at the midpoint of the 8-bit gray scale (128,128,128). X11 defined gray to be (190,190,190); which is closer to HTML silver.
There are several gray color names in HTML / CSS. All gray colors are spelled as gray (not grey). This spelling was inherited from the X11 standard. All modern browsers accept both gray and grey, but early versions of Internet Explorer did not recognize grey.
If you look at the color table below, you will see the result of varying the red light from 0 to 255, while keeping the green and blue light at zero. Click on the hexadecimal values, if you want to analyze the color in our color picker.
|
Red Light |
HEX |
RGB |
|
|
rgb(0,0,0) |
|
|
|
rgb(8,0,0) |
|
|
|
rgb(16,0,0) |
|
|
|
rgb(24,0,0) |
|
|
|
rgb(32,0,0) |
|
|
|
rgb(40,0,0) |
|
|
|
rgb(48,0,0) |
|
|
|
rgb(56,0,0) |
|
|
|
rgb(64,0,0) |
|
|
|
rgb(72,0,0) |
|
|
|
rgb(80,0,0) |
|
|
|
rgb(88,0,0) |
|
|
|
rgb(96,0,0) |
|
|
|
rgb(104,0,0) |
|
|
|
rgb(112,0,0) |
|
|
|
rgb(120,0,0) |
|
|
|
rgb(128,0,0) |
|
|
|
rgb(136,0,0) |
|
|
|
rgb(144,0,0) |
|
|
|
rgb(152,0,0) |
|
|
|
rgb(160,0,0) |
|
|
|
rgb(168,0,0) |
|
|
|
rgb(176,0,0) |
|
|
|
rgb(184,0,0) |
|
|
|
rgb(192,0,0) |
|
|
|
rgb(200,0,0) |
|
|
|
rgb(208,0,0) |
|
|
|
rgb(216,0,0) |
|
|
|
rgb(224,0,0) |
|
|
|
rgb(232,0,0) |
|
|
|
rgb(240,0,0) |
|
|
|
rgb(248,0,0) |
|
|
|
rgb(255,0,0) |
16 Million Different Colors
The combination of Red, Green and Blue values from 0 to 255 gives a total of more than 16 million different colors to play with (256 x 256 x 256). Most modern monitors are capable of displaying at least 16384 different colors.
Many years ago, when computers supported maximum 256 different colors, alist of 216 “Web Safe Colors” was suggested as a Web standard (reserving 40 fixed system colors). This is not important now, since most computers can display millions ofdifferent colors. This 216 hex values cross-browser color palette was created to ensure that all computers would display the colors correctly when running a 256 color palette:
|
000000 |
000033 |
000066 |
000099 |
0000CC |
0000FF |
|
003300 |
003333 |
003366 |
003399 |
0033CC |
0033FF |
|
006600 |
006633 |
006666 |
006699 |
0066CC |
0066FF |
|
009900 |
009933 |
009966 |
009999 |
0099CC |
0099FF |
|
00CC00 |
00CC33 |
00CC66 |
00CC99 |
00CCCC |
00CCFF |
|
00FF00 |
00FF33 |
00FF66 |
00FF99 |
00FFCC |
00FFFF |
|
330000 |
330033 |
330066 |
330099 |
3300CC |
3300FF |
|
333300 |
333333 |
333366 |
333399 |
3333CC |
3333FF |
|
336600 |
336633 |
336666 |
336699 |
3366CC |
3366FF |
|
339900 |
339933 |
339966 |
339999 |
3399CC |
3399FF |
|
33CC00 |
33CC33 |
33CC66 |
33CC99 |
33CCCC |
33CCFF |
|
33FF00 |
33FF33 |
33FF66 |
33FF99 |
33FFCC |
33FFFF |
|
660000 |
660033 |
660066 |
660099 |
6600CC |
6600FF |
|
663300 |
663333 |
663366 |
663399 |
6633CC |
6633FF |
|
666600 |
666633 |
666666 |
666699 |
6666CC |
6666FF |
|
669900 |
669933 |
669966 |
669999 |
6699CC |
6699FF |
|
66CC00 |
66CC33 |
66CC66 |
66CC99 |
66CCCC |
66CCFF |
|
66FF00 |
66FF33 |
66FF66 |
66FF99 |
66FFCC |
66FFFF |
|
990000 |
990033 |
990066 |
990099 |
9900CC |
9900FF |
|
993300 |
993333 |
993366 |
993399 |
9933CC |
9933FF |
|
996600 |
996633 |
996666 |
996699 |
9966CC |
9966FF |
|
999900 |
999933 |
999966 |
999999 |
9999CC |
9999FF |
|
99CC00 |
99CC33 |
99CC66 |
99CC99 |
99CCCC |
99CCFF |
|
99FF00 |
99FF33 |
99FF66 |
99FF99 |
99FFCC |
99FFFF |
|
CC0000 |
CC0033 |
CC0066 |
CC0099 |
CC00CC |
CC00FF |
|
CC3300 |
CC3333 |
CC3366 |
CC3399 |
CC33CC |
CC33FF |
|
CC6600 |
CC6633 |
CC6666 |
CC6699 |
CC66CC |
CC66FF |
|
CC9900 |
CC9933 |
CC9966 |
CC9999 |
CC99CC |
CC99FF |
|
CCCC00 |
CCCC33 |
CCCC66 |
CCCC99 |
CCCCCC |
CCCCFF |
|
CCFF00 |
CCFF33 |
CCFF66 |
CCFF99 |
CCFFCC |
CCFFFF |
|
FF0000 |
FF0033 |
FF0066 |
FF0099 |
FF00CC |
FF00FF |
|
FF3300 |
FF3333 |
FF3366 |
FF3399 |
FF33CC |
FF33FF |
|
FF6600 |
FF6633 |
FF6666 |
FF6699 |
FF66CC |
FF66FF |
|
FF9900 |
FF9933 |
FF9966 |
FF9999 |
FF99CC |
FF99FF |
|
FFCC00 |
FFCC33 |
FFCC66 |
FFCC99 |
FFCCCC |
FFCCFF |
|
FFFF00 |
FFFF33 |
FFFF66 |
FFFF99 |
FFFFCC |
FFFFFF |
HSL color values are supported in IE9+, Firefox, Chrome, Safari, and in Opera 10+. HSL stands for hue, saturation, and lightness. HSL color values are specified with: hsl(hue, saturation, lightness).
Hue is a degree on the color wheel from 0 to 360. 0 is red, 120 is green, 240 is blue. Hue is just another word for color.
Saturation is a percentage value; 0% means a shade of gray and 100% is the full color. aturation is about intensity. Highly saturated colors are bright. Desaturated colors have less pigment.
Lightness is also a percentage; 0% is black, 100% is white.
Color value is a term for how light or dark dark a color is (from white to black)
(Hue, Whiteness, Blackness) is a suggested standard for CSS4. HWB is not supported in HTML (yet), but it is suggested as a new standard in CSS4.
CMYK colors is a combination of CYAN, MAGENTA, YELLOW , and BLACK. Computer screens display colors using RGB color values. Printers often presents colors using CMYK color values. CMYK is not supported in HTML, but it is suggested as a new standard in CSS4.
Hue
|
|
hue |
Hex |
Rgb |
Hsl |
|
|
0 |
#ff0000 |
rgb(255, |
hsl(0, 100%, |
|
|
15 |
#ff4000 |
rgb(255, |
hsl(15, |
|
|
30 |
#ff8000 |
rgb(255, |
hsl(30, |
|
|
45 |
#ffbf00 |
rgb(255, |
hsl(45, |
|
|
60 |
#ffff00 |
rgb(255, |
hsl(60, |
|
|
75 |
#bfff00 |
rgb(191, |
hsl(75, |
|
|
90 |
#80ff00 |
rgb(128, |
hsl(90, |
|
|
105 |
#40ff00 |
rgb(64, |
hsl(105, |
|
|
120 |
#00ff00 |
rgb(0, |
hsl(120, |
|
|
135 |
#00ff40 |
rgb(0, |
hsl(135, |
|
|
150 |
#00ff80 |
rgb(0, |
hsl(150, |
|
|
165 |
#00ffbf |
rgb(0, |
hsl(165, |
|
|
180 |
#00ffff |
rgb(0, |
hsl(180, |
|
|
195 |
#00bfff |
rgb(0, |
hsl(195, |
|
|
210 |
#0080ff |
rgb(0, |
hsl(210, |
|
|
225 |
#0040ff |
rgb(0, |
hsl(225, |
|
|
240 |
#0000ff |
rgb(0, |
hsl(240, |
|
|
255 |
#4000ff |
rgb(64, |
hsl(255, |
|
|
270 |
#8000ff |
rgb(128, |
hsl(270, |
|
|
285 |
#bf00ff |
rgb(191, |
hsl(285, |
|
|
300 |
#ff00ff |
rgb(255, |
hsl(300, |
|
|
315 |
#ff00bf |
rgb(255, |
hsl(315, |
|
|
330 |
#ff0080 |
rgb(255, |
hsl(330, |
|
|
345 |
#ff0040 |
rgb(255, |
hsl(345, |
|
|
360 |
#ff0000 |
rgb(255, |
hsl(0, |
|
sat |
Hex |
Rgb |
Hsl |
|
|
100% |
#ff0000 |
rgb(255, |
hsl(0, |
|
|
95% |
#f90606 |
rgb(249, |
hsl(0, |
|
|
90% |
#f20d0d |
rgb(242, |
hsl(0, |
|
|
85% |
#ec1313 |
rgb(236, |
hsl(0, |
|
|
80% |
#e61919 |
rgb(230, |
hsl(0, |
|
|
75% |
#df2020 |
rgb(223, |
hsl(0, |
|
|
70% |
#d92626 |
rgb(217, |
hsl(0, |
|
|
65% |
#d22d2d |
rgb(210, |
hsl(0, |
|
|
60% |
#cc3333 |
rgb(204, |
hsl(0, |
|
|
55% |
#c63939 |
rgb(198, |
hsl(0, |
|
|
50% |
#bf4040 |
rgb(191, |
hsl(0, |
|
|
45% |
#b94646 |
rgb(185, |
hsl(0, |
|
|
40% |
#b34d4d |
rgb(179, |
hsl(0, |
|
|
35% |
#ac5353 |
rgb(172, |
hsl(0, |
|
|
30% |
#a65959 |
rgb(166, |
hsl(0, |
|
|
25% |
#9f6060 |
rgb(159, |
hsl(0, |
|
|
20% |
#996666 |
rgb(153, |
hsl(0, |
|
|
15% |
#936c6c |
rgb(147, |
hsl(0, |
|
|
10% |
#8c7373 |
rgb(140, |
hsl(0, |
|
|
5% |
#867979 |
rgb(134, |
hsl(0, |
|
|
0% |
#808080 |
rgb(128, |
hsl(0, |
|
light |
Hex |
Rgb |
Hsl |
|
|
100% |
#ffffff |
rgb(255, |
hsl(0, |
|
|
95% |
#ffe6e6 |
rgb(255, |
hsl(0, |
|
|
90% |
#ffcccc |
rgb(255, |
hsl(0, |
|
|
85% |
#ffb3b3 |
rgb(255, |
hsl(0, |
|
|
80% |
#ff9999 |
rgb(255, |
hsl(0, |
|
|
75% |
#ff8080 |
rgb(255, |
hsl(0, |
|
|
70% |
#ff6666 |
rgb(255, |
hsl(0, |
|
|
65% |
#ff4d4d |
rgb(255, |
hsl(0, |
|
|
60% |
#ff3333 |
rgb(255, |
hsl(0, |
|
|
55% |
#ff1a1a |
rgb(255, |
hsl(0, |
|
|
50% |
#ff0000 |
rgb(255, |
hsl(0, |
|
|
45% |
#e60000 |
rgb(230, |
hsl(0, |
|
|
40% |
#cc0000 |
rgb(204, |
hsl(0, |
|
|
35% |
#b30000 |
rgb(179, |
hsl(0, |
|
|
30% |
#990000 |
rgb(153, |
hsl(0, |
|
|
25% |
#800000 |
rgb(128, |
hsl(0, |
|
|
20% |
#660000 |
rgb(102, |
hsl(0, |
|
|
15% |
#4d0000 |
rgb(77, |
hsl(0, |
|
|
10% |
#330000 |
rgb(51, |
hsl(0, |
|
|
5% |
#1a0000 |
rgb(26, 0, |
hsl(0, |
|
|
0% |
#000000 |
rgb(0, |
hsl(0, |
Natural colors (NCol) is an initiative from W3Schools. The system is designed to make it easier to select HTML colors. NCol specifies colors using a color letter with a number to specify the distance (in percent) from the color. R30 means 30% away from Red , moving towards Yellow. (In other words: Red with 30% Yellow)
|
Letter |
Color |
Hues |
|
R |
Red |
R R25 R50 R75 |
|
Y |
Yellow |
Y Y25 Y50 Y75 |
|
G |
Green |
G G25 G50 G75 |
|
C |
Cyan |
C C25 C50 C75 |
|
B |
Blue |
B B25 B50 B75 |
|
M |
Magenta |
M M25 M50 M75 |
|
R |
Y |
G |
C |
B |
M |
||||||||||||||||||||||||||||||||||||||||||||||||||||||
|
|
|
|
|
|
|
|
|
|
|
|
|
|
|
|
|
|
|
|
|
|
|
|
|
|
|
|
|
|
|
|
|
|
|
|
|
|
|
|
|
|
|
|
|
|
|
|
|
|
|
|
|
|
|
|
|
|
|
|
|
Color and distance can also be given in hues (0-360):
|
R = 000 |
Y = 060 |
G = 120 |
C = 180 |
B = 240 |
M = 300 |
We will cover 3 different color systems:
Printing actually uses a four ink color system. CMYK: Cyan, Magenta, Yellow, and Key (black).
Primary colors are the main colors in a given color system. Primary colors can not be produced by mixing other colors a color system. The primary colors for light are Red, Green, and Blue:
|
RGB |
Red |
Green |
Blue |
The primary colors for print are Cyan, Magenta, and Yellow:
|
|
|||
|
CMY |
Cyan |
Magenta |
Yellow |
The primary colors for paint are Red, Yellow, and Blue:
|
|
|||
|
RYB |
Red |
Yellow |
Blue |
Secondary colors are made by mixing two primary colors in a color system There are 3 secondary colors in the color systems described here.
Secondary colors are Yellow, Cyan Magenta.
|
Red |
+ |
Green |
= |
Yellow |
|
Green |
+ |
Blue |
= |
Cyan |
|
Blue |
+ |
Red |
= |
Magenta |
Secondary colors are Blue, Red, Green.
|
Cyan |
+ |
Magenta |
= |
Blue |
|
Magenta |
+ |
Yellow |
= |
Red |
|
Yellow |
+ |
Cyan |
= |
Green |
Note that mixing the primary colors of CMY produces the primary colors of
light (RGB)
Secondary colors are Orange, Green, Violet.
|
Red |
+ |
Yellow |
= |
Orange |
|
Yellow |
+ |
Blue |
= |
Green |
|
Blue |
+ |
Red |
= |
Purple |
Tertiary colors are made by mixing one primary and one
secondary color in a color system.
There are six named tertiary colors in RYB:
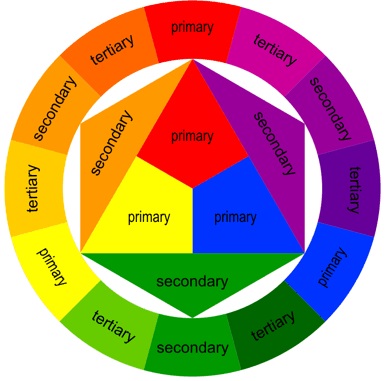
A color wheel is an illustrative organization of colors around a circle,
showing the relationships between primary colors, secondary colors, and
tertiary colors.

How many ways can you rearrange the rainbow?
RGB
 Red, Green, Blue
CMY
 Cyan, Magenta, Yellow
RYB
 Red, Yellow, Blue
The RGB (Red, Green, Blue) color wheel represents the 3 light sources used to produce colors on a TV or computer screen.
Primary colors are Red, Green, and Blue.
Secondary colors are created by mixing primary colors:
Red and Green= Yellow
Green and Blue = Cyan
Blue and Red = Magenta
The RGB (Red, Green, Blue) color wheel represents the 3 light sources used to produce colors on a TV or computer screen.
Primary colors are Red, Green, and Blue.
Secondary colors are created by mixing primary colors:
Red and Green= Yellow
Green and Blue = Cyan
Blue and Red = Magenta
|
RED |
#FF8000 |
YELLOW |
#80FF00 |
GREEN |
#00FF80 |
|
CYAN |
|
BLUE |
|
MAGENTA |
|
RGB Green is different from the HTML color named
Green.
RGB Green is different
from the HTML color named Green.
The CMY(K) (Cyan, Magenta, Yellow) represent the colors used to print on paper.
The primary colors are Cyan, Magenta, and Yellow.
Secondary colors are created by mixing primary colors:
Cyan and Magenta = Blue
Magenta and Yellow = Red
Yellow and Cyan = Green.
|
CYAN |
|
BLUE |
|
MAGENTA |
|
|
RED |
#FF8000 |
YELLOW |
#80FF00 |
GREEN |
#00FF80 |
The RYB (Red, Yellow, Blue) color wheel is used by painters, artists and designers for blending pigment colors.
The 3 primary colors are Red, Yellow, and Blue.
Secondary colors are created by mixing primary colors.
The 3 secondary colors are Orange, Green, and Purple.
Red and Yellow = Orange
Yellow and Blue = Green
Blue and Red = Purple.
The tertiary colors are made by mixing two secondary colors.
The 6 tertiary colors are Red-Orange, Yellow-Orange, Yellow-Green, Blue-Green, Blue-Purple, Red-Purple
|
RED |
R-O |
ORANGE |
Y-O |
YELLOW |
Y-G |
|
GREEN |
B-G |
BLUE |
B-P |
PURPLE |
R-P |
RYB is the best color wheel to identify the colors that go well together. The RYB wheel can be used to create pleasing color schemes for the web.
HEX: #a2b9bc
HEX: #b2ad7f
HEX: #878f99
HEX: #6b5b95
HEX: #6b5b95
HEX: #feb236
HEX: #d64161
HEX: #ff7b25
HEX: #d6cbd3
HEX: #eca1a6
HEX: #bdcebe
HEX: #ada397
HEX: #d5e1df
HEX: #e3eaa7
HEX: #b5e7a0
HEX: #86af49
HEX: #b9936c
HEX: #dac292
HEX: #e6e2d3
HEX: #c4b7a6
HEX: #3e4444
HEX: #82b74b
HEX: #405d27
HEX: #c1946a
HEX: #92a8d1
HEX: #034f84
HEX: #f7cac9
HEX: #f7786b
HEX: #deeaee
HEX: #b1cbbb
HEX: #eea29a
HEX: #c94c4c
HEX: #d5f4e6
HEX: #80ced6
HEX: #fefbd8
HEX: #618685
HEX: #ffef96
HEX: #50394c
HEX: #b2b2b2
HEX: #f4e1d2
HEX: #fefbd8
HEX: #618685
HEX: #36486b
HEX: #4040a1
HEX: #b2b2b2
HEX: #f4e1d2
HEX: #f18973
HEX: #bc5a45
HEX: #f0f0f0
HEX: #c5d5c5
HEX: #9fa9a3
HEX: #e3e0cc
HEX: #eaece5
HEX: #b2c2bf
HEX: #c0ded9
HEX: #3b3a30
HEX: #e4d1d1
HEX: #b9b0b0
HEX: #d9ecd0
HEX: #77a8a8
HEX: #f0efef
HEX: #ddeedd
HEX: #c2d4dd
HEX: #b0aac0
HEX: #c8c3cc
HEX: #563f46
HEX: #8ca3a3
HEX: #484f4f
HEX: #e0e2e4
HEX: #c6bcb6
HEX: #96897f
HEX: #625750
HEX: #7e4a35
HEX: #cab577
HEX: #dbceb0
HEX: #838060
HEX: #bbab9b
HEX: #8b6f47
HEX: #d4ac6e
HEX: #4f3222
HEX: #686256
HEX: #c1502e
HEX: #587e76
HEX: #a96e5b
HEX: #454140
HEX: #bd5734
HEX: #a79e84
HEX: #7a3b2e
HEX: #bccad6
HEX: #8d9db6
HEX: #667292
HEX: #f1e3dd
HEX: #cfe0e8
HEX: #b7d7e8
HEX: #87bdd8
HEX: #daebe8
HEX: #fbefcc
HEX: #f9ccac
HEX: #f4a688
HEX: #e0876a
HEX: #fff2df
HEX: #d9ad7c
HEX: #a2836e
HEX: #674d3c
HEX: #f9d5e5
HEX: #eeac99
HEX: #e06377
HEX: #c83349
HEX: #5b9aa0
HEX: #d6d4e0
HEX: #b8a9c9
HEX: #622569
HEX: #96ceb4
HEX: #ffeead
HEX: #ffcc5c
HEX: #ff6f69
HEX: #588c7e
HEX: #f2e394
HEX: #f2ae72
HEX: #d96459
The hex values below are approximate values intended to simulate
branded colors.

HEX: #4285F4
HEX: #FBBC05
HEX: #34A853
HEX: #EA4335

HEX: #55ACEE
HEX: #292F33
HEX: #66757F
HEX: #CCD6DD
HEX: #E1E8ED
HEX: #FFFFFF

HEX: #3B5998
HEX: #8B9DC3
HEX: #DFE3EE
HEX: #F7F7F7
HEX: #FFFFFF

HEX: #F65314
HEX: #7CBB00
HEX: #00A1F1
HEX: #FFBB00
HEX: #0F7DC2
HEX: #3F729B
HEX: #006699
HEX: #7B0099
HEX: #FF9900
HEX: #146EB4
HEX: #221F1F
HEX: #E50914
HEX: #F5F5F1
HEX: #ED1C16
HEX: #E32934
HEX: #004883
HEX: #FFCC00
HEX: #003399
HEX: #A4C639
Source: https://www.w3schools.com/colors/
Total Commander is a file manager for Windows, a program like Windows Explorer to copy, move or delete files. However, Total Commander can do much more than Explorer, e.g. pack and unpack files, access ftp servers, compare files by content, etc!
It was known as Windows Commander and in 2002 there was a name change – the new name is “Total Commander”.
See the latest version at https://www.ghisler.com/
Total Commander is very configurable, and you should take advantage of this. Go through the entire Configuration dialog, and set it up the way you like it. If you don’t understand what an option does, consult the manual. This may take you 15 minutes, but the program will work the way you want it afterwards. Some suggestions follow.
Limiting yourself to classic GUI interface is not wise. Command line interface , especially in mixed form when elements of the GUI can be used to help to form a command and provide feedback is powerful and available tools that should not be abandoned just because it is out of fashion. But the opposite danger also exists. In a way extremes meet: It is equally unwise to completely ignore GUI interface (and mouse as a very useful, excellent tool) like some Unix sysadmin prefer. There are situations when using GUI is much more productive.
And GUI interface itself should never be associated only with classic Windows-style interface. Other forms including hybrid are also possible. In this sense dominance of windows and Microsoft Office shut out all alternatives.
But, nevertheless, they do exist. (Read more at http://www.softpanorama.org/OFM/gui_vs_command_line.shtml)
When using Total Commander, always remember that the keyboard is quicker than the mouse. At first, you may need to have the function key buttons in view to remember what each key does. Later on, however, you may realize that you don’t need them, and hide them to save screen space.
When moving around the directories, use the arrow keys. You can move left and right as well as up and down. To switch to the “Brief” view, press Ctrl+F1. You may also use the Home/End/PageUp/PageDown navigation keys. The selection of files is done by either holding down shift while moving around, or pressing the spacebar when a cursor is over the file you want to select. When using the spacebar method on directories, the space they occupy will be shown in the status bar. You may also select large groups of files with the right mouse button.
Total Commander also supports browser-like back/forward navigation. The same shortcut keys – Alt+Left for back and Alt+Right for forward – apply here. You can also use the mouse with the toolbar buttons. Backspace will take you one directory level up.
Be sure to make use of the internal zip packer and unpacker. Press Alt+F5 to pack a group of files, and Alt+F9 to unpack them. You may also navigate inside of archives, including nested archives. Just select one and press Enter like always. This also works for other archives, such as RAR, ACE, CAB, and the self-extracting versions of these (Press Ctrl+PageDown to navigate inside of a self-extracting archive.)
If you need to do something via the menus, try to remember the shortcut key next time. If the menu item doesn’t have a shortcut key, you can map one to your liking. Go to the Configuration dialog, and open the Misc tab. On the bottom, you’ll see the Redefine hotkeys area. If you don’t, you’re probably using an older version – the feature was introduced in version 4.02. Remapping the keys may seem a bit awkward at first. You must first choose the key combination by checking the Control, Alt, and/or Shift buttons and choosing the key that goes with them from the selection box. Then, select the command you wish to map the key to. Finally, click the checkbox button to make the key binding take effect.
Selecting files is very easy. Just right-click a file to select it. Right-click again to deselect. You can also drag the right mouse button to select groups of files. Selection with the keyboard is very versatile. Here’s a short list of shortcuts you should be familiar with (I only listed the most useful ones).
| Keystroke | Function |
|---|---|
| Spacebar | Select or deselect the file at the cursor. |
| +/- (number pad) | Select/deselect files using a mask you specify. |
| Ctrl +/- | Select/deselect all files. |
| Alt +/- | Select/deselect all files with the same extension. |
| * | Reverse selection. |
You can make file browsing a lot easier by using the Define colors by file type option. This is very useful if you often work with a particular kind of file. To use this feature, go to the Options dialog (Configuration | Options) and then switch to the Color tab. Click the Define colors by file type button; You’ll have to check the checkbox next to it if it isn’t already checked. Besides defining colors by a file’s name, you can also define colors by the file’s attributes, size, or other options. For example, you could define the colors so that files larger than a certain size are easily visible, or so that executable files are a different color. It’s a good idea to make directories a different color, especially if you aren’t using symbols (icons) so that they stand out in a directory listing. The possibilities are endless!
Learn how to use the Multi-Rename Tool, a new feature in Total Commander 4.50 and above. It can be very useful if you need to rename a large amount of files using the same rule. Select all the files you want to rename, and then press Ctrl+M. If you need help, press F1 for detailed documentation.
To quickly copy a file’s name, press Shift+F6 and then Ctrl+C or Shift+Ins to copy its name. Press Escape to cancel the rename process.
Total Commander 4.52 also includes a great command to view all files in a subdirectory. This is useful in many different situations, such as renaming a group of files that are distributed among a tree of directories. To use this feature, just press Ctrl+B. If you don’t have version 4.52, you can duplicate this feature with the following steps:
This feature can also be used in conjunction with the Multi-Rename Tool. Be careful when using it, though, as it can take a very long time to list all of the files in a big tree, such as the root directory of a drive.
| F1 | Help |
| F2 | Reread source window |
| F3 | List files |
| F4 | Edit files |
| F5 | Copy files |
| F6 | Rename or move files |
| F7 | Create directory |
| F8 | Delete files to recycle bin /delete directly – according to configuration (or Delete) |
| F9 | Activate menu above source window (left or right) |
| F10 | Activate left menu or deactivate menu |
| Alt+F1 | change left drive |
| Alt+F2 | change right drive |
| Alt+F3 | Use alternate (external or internal) viewer |
| Alt+Shift+F3 | Start Lister and load file with internal viewer (no plugins or multimedia) |
| Alt+F4 | Exit | Minimize (with option MinimizeOnClose in wincmd.ini) |
| Alt+F5 | Pack files |
| Alt+Shift+F5 | Move to archive |
| Alt+F6 | Unpack specified files from archive under cursor, or selected archives (use Alt+F9 on Windows 95) |
| Alt+F7 | Find |
| Alt+F8 | Opens the history list of the command line |
| Alt+F9 | Same as ALT+F6 (because ALT+F6 is broken on Windows 95) |
| Alt+Shift+F9 | Test archives |
| Alt+F10 | Opens a dialog box with the current directory tree |
| Alt+F11 | Opens left current directory bar (breadcrumb bar) |
| Alt+F12 | Opens right current directory bar (breadcrumb bar) |
| Alt+Shift+F11 | Focus the button bar to use it with the keyboard |
| Shift+F1 | Custom columns view menu |
| Shift+F2 | Compare file lists |
| Shift+F3 | List only file under cursor, when multiple files selected |
| Shift+F4 | Create new text file and load into editor |
| Shift+F5 | Copy files (with rename) in the same directory |
| Shift+Ctrl+F5 | Create shortcuts of the selected files |
| Shift+F6 | Rename files in the same directory |
| Shift+F8/Delete | Delete directly / delete to recycle bin – according to configuration |
| Shift+F10 | Show context menu |
| Shift+Esc | Minimizes Total Commander to an icon |
| Alt+Arrow left / Arrow right | Go to previous/next dir of already visited dirs |
| Alt+Arrow down | Open history list of already visited dirs (like the history list in a WWW browser) |
| Num + | Expand selection (configurable: just files or files and folders) |
| Num – | Shrink selection |
| Num * | Invert selection (also with shift, see link) |
| Num / | Restore selection |
| Shift+Num+[+] | Like Num +, but files and folders if Num + selects just files (and vice versa) |
| Shift+Num+- | Always removes the selection just from files (Num – from files and folders) |
| Shift+Num+* | Like Num *, but files and folders if Num * inverts selection of just files (and vice versa) |
| Ctrl+Num + | Select all (configurable: just files or files and folders) |
| Ctrl+Shift+Num + | Select all (files and folders if CTRL+Num + selects only files) |
| Ctrl+Num – | Deselect all (always files and folders) |
| Ctrl+Shift+Num – | Deselect all (always files, no folders) |
| Alt+Num + | Select all files with the same extension |
| Alt+Num – | Remove selection from files with the same extension |
| Ctrl+Page up | Change to parent directory (cd ..) , or Backspace |
| Ctrl+< | Jump to the root directory (most European keyboards) |
| Ctrl+\ | Jump to the root directory (US keyboard) |
| Ctrl+Page down | Open directory/archive (also self extracting .EXE archives) |
| Ctrl+Arrow left / Arrow right | Open directory/archive and display it in the target window. If the cursor is not on a directory name, or the other panel is active, then the current directory is displayed instead. |
| Ctrl+F1 | File display ‘brief’ (only file names) |
| Ctrl+Shift+F1 | Thumbnails view (preview pictures) |
| Ctrl+F2 | File display ‘full’ (all file details) |
| Ctrl+Shift+F2 | Comments view (new comments are created with Ctrl+Z) |
| Ctrl+F3 | Sort by name |
| Ctrl+F4 | Sort by extension |
| Ctrl+F5 | Sort by date/time |
| Ctrl+F6 | Sort by size |
| Ctrl+F7 | Unsorted |
| Ctrl+F8 | Display directory tree |
| Ctrl+Shift+F8 | Cycle through separate directory tree states: one tree, two trees, off |
| Ctrl+F9 | Print file under cursor using the associated program |
| Ctrl+F10 | Show all files |
| Ctrl+F11 | Show only programs |
| Ctrl+F12 | Show user defined files |
| Tab | Switch between left and right file list |
| Shift+Tab | Switch between current file list and separate tree (if enabled) |
| Insert | Select file or directory. |
| Space | Select file or directory (as INSERT). If SPACE is used on an unselected directory under the cursor, the contents in this directory are counted and the size is shown in the “full” view instead of the string . This can be disabled through ‘Configuration’ – ‘Options’ – ‘Operation’ – ‘Selection with Space’. |
| Enter | Change directory / run program / run associated program / execute command line if not empty. If the source directory shows the contents of an archive, further information on the packed file is given. |
| Shift+Enter | 1. Runs command line / program under cursor with preceding command /c and leave the program’s window open. Only works if NOCLOSE.PIF is in your Windows directory! 2. With ZIP files: use alternative choice of these (as chosen in Packer config): (Treat archives like directories <-> call associated program, i.e. winzip or quinzip) 3. In the list of last used dirs (History, Ctrl+D), open the directory on a new Tab. |
| Alt+Shift+Enter | The contents of all directories in the current directory are counted. The sizes of the directories are then shown in the “full” view instead of the string . Abort by holding down ESC key. |
| Alt+Enter | Show property sheet. |
| Ctrl+a | Select all |
| Ctrl+b | Directory branch: Show contents of current dir and all subdirs in one list |
| Ctrl+Shift+b | Selected directory branch: Show selected files, and all in selected subdirs |
| Ctrl+c | Copy files to clipboard |
| Ctrl+x | Cut files to clipboard |
| Ctrl+v | Paste from clipboard to current dir. |
| Ctrl+d | Open directory hotlist (‘bookmarks’) |
| Ctrl+f | Connect to FTP server |
| Ctrl+Shift+f | Disconnect from FTP server |
| Ctrl+i | Switch to target directory |
| Ctrl+l | Calculate occupied space (of the selected files) |
| Ctrl+m | Multi-Rename-Tool |
| Ctrl+Shift+m | Change FTP transfer mode |
| Ctrl+n | New FTP connection (enter URL or host address) |
| Ctrl+p | Copy current path to command line |
| Ctrl+q | Quick view panel instead of file window |
| Ctrl+r | Reread source directory |
| Ctrl+s | Open Quick Filter dialog and activate filter (deactivate with ESC or CTRL+F10) |
| Ctrl+Shift+s | Open Quick Filter dialog and reactivate last-used filter |
| Ctrl+t | Open new folder tab and activate it |
| Ctrl+Shift+t | Open new folder tab, but do not activate it |
| Ctrl+u | Exchange directories |
| Ctrl+Shift+u | Exchange directories and tabs |
| Ctrl+w | Close currently active tab |
| Ctrl+Shift+w | Close all open tabs |
| Ctrl+z | Edit file comment |
| Ctrl+Arrow up | Open dir under cursor in new tab |
| Ctrl+Shift+Arrow Up | Open dir under cursor in other window (new tab) |
| Ctrl+Tab/Ctrl+Shift+Tab | Jump to next tab / jump to previous tab |
| Ctrl+Alt+Letter | Quick search for a file name (starting with specified letters) in the current directory (Support hotkeys Ctrl+X, Ctrl+C, Ctrl+V and Ctrl+A; use Ctrl+S for search filter on/off) |
| Ctrl+F | Connect to FTP Server |
| Ctrl+SHIFT+F | Disconnect current FTP connection |
| Ctrl+N | New FTP connection |
| Insert/Space | Select current file/folder |
| Num * | Invert selection |
| Num / | Restore selection |
| Ctrl+A | Select all |
| Ctrl+l | Calculate occupied space of selecte files |
| Ctrl+Num – | Deselect all |
| Alt+Num+ | Select all files with extension |
| Alt+Num- | Deselect all files with extension |
| Alt+F1 | Change left drive |
| Alt+F2 | Change right drive |
| Alt+Arrow Down | Open list of visited directories |
| Alt+Arrow Left | Jump to previous directory |
| Alt+Arrow Right | Jump to next directory |
| Ctrl+< | Jump to root directory |
| Backspace | Change to parent directory |
| Tab | Switch between left and right file list |
| Ctrl+u | Swap left & right view |
| F2/Ctrl+r | Refresh current directory |
| Ctrl+b | Show contents of current dir and all subdirs in one list |
| Ctrl+Shift+B | Selected directory branch |
| Alt+Enter | Show file properties window |
| F1 | Help |
| Ctrl+l | Calculate occupied space (of selecte files) |
| F3 | List file contents |
| Shift+F3 | List file under cursor with multiple files selected |
| F4 | Edit files |
| Shift+F4 | Create new text file and load in editor |
| F5/Ctrl+c | Copy file |
| Shift+F5 | Copy files (with rename) in same directory |
| F6 | Rename or move files |
| Shift+F6 | Rename files in same directory |
| F7 | Create directory |
| F8/Delete | Delete files |
| Ctrl+v | Paste file in current directory |
| Ctrl+x | Cut file |
| Ctrl+m | Multi-rename tool |
| Alt+F5 | Pack files |
| Alt+Shift+F5 | Move to archive |
| Alt+F6 | Unpack from archive under cursor |
| Alt+Shift+F9 | Test archives |
| Ctrl+F3 | Sort by name |
| Ctrl+F4 | Sort by extension |
| Ctrl+F5 | Sort by date/time |
| Ctrl+F6 | Sort by size |
| Ctrl+F7 | Unsorted |
| Ctrl+s | Quick search |
| Alt+F7 | Find |
%comspec% Envoke CMD (ancient times)
CMD Envoke CMD
CMD /C Carries out the command specified by string and then terminates
CMD /K Carries out the command specified by string but remains
(For more complete CMD with switches see relevant CMD cheatsheet)
Ctrl+Shift+w Close all open tabs
Ctrl+z Edit file comment
Ctrl+Arrow up Open dir under cursor in new tab
Ctrl+Shift+Arrow Up Open dir under cursor in other window (new tab)
Ctrl+Tab/Ctrl+Shift+Tab Jump to next tab / jump to previous tab
Ctrl+Alt+Letter Quick search for a file name (starting with specified letters) in the current directory
(Support hotkeys Ctrl+X, Ctrl+C, Ctrl+V and Ctrl+A; use Ctrl+S for search filter on/off)
Ctrl+ArrowLeft/Right Duplicate current path of the panel in the other panel
| ? | As the first parameter causes a Dialog box to be displayed before starting the program, containing the following parameters. You can change the parameters before starting the program. You can even prevent the program’s execution. |
| %P | Causes the source path to be inserted into the command line, including a backslash (\) at the end. |
| %N | Places the filename under the cursor into the command line. |
| %T | Inserts the current target path. Especially useful for packers. |
| %M | Places the current filename in the target directory into the command line. |
| %O | Places the current filename without extension into the command line. |
| %E | Places the current extension (without leading period) into the command line. Note: %N and %M insert the long name, while %n and %m insert the DOS alias name (8.3). %P and %T insert the long path name, and %p and %t the short path name. (Same for %o and %e) |
| %% | Inserts the percent sign. |
| %L | Long file names including the complete path, e.g. c:\Program Files\Long name.exe |
| %l (lowercase L) | Short file names including the complete path, e.g. C:\PROGRA~1\LONGNA~1.EXE |
| %F | Long file names without path, e.g. Long name.exe |
| %f | Short file names without path, e.g. LONGNA~1.EXE |
| %D | Short file names including the complete path, but using the DOS character set for accents. |
| %d | Short file names without path, but using the DOS character set for accents. |
| Step 1.Create a new button on the button bar |
| Step 2.Using the menu, insert the path to the ImgBurn executable |
| Step 3.Insert the string below as the value in the Parameters box: |
| This will feed a file to the standard build menu?/MODE BUILD /BUILDINPUTMODE STANDARD /BUILDOUTPUTMODE DEVICE /SRCLIST “%P%N” /FILESYSTEM “UDF” /UDFREVISION “1.02” /NOIMAGEDETAILS /ROOTFOLDER YES /NOSAVESETTINGS /VERIFY /VOLUMELABEL “%O” |
| You can use the cheats above to figure out what is going on in this string. |
| Step 4.Choose the icon for the button and press ok. |
| The Total Commander Site | http://www.ghisler.com/ |
| TC wiki | https://www.ghisler.ch/wiki |
| An unofficial database of plugins | www.totalcmd.net |
| Source of this cheatsheet | http://www.ghisler.ch/wiki/index.php/Buttonbar#Special_parameters: |
| TC forum | https://www.ghisler.ch/board/ |
Like any powerful tool, Total Commander won’t work the way you want it right away. Until you use it a little and learn how it works, it may even seem a bit uncomfortable. But don’t be discouraged, as the payoff is too great to ignore. You’ll do all your file management a lot faster. An experienced person using Total Commander may seem like a magician to observers.