Quick steps to install available below:
Accessing the EC2 instance via SSH or BitViseSSH or OpenSSH (described in another post .Link here soon)
You have two options accessing the EC2 instance:
• Connect via your browser using the Java SSH Client provided by AWS
• Connect using PuTTY: a free telnet/ssh client
If you choose to use PuTTY you will need to convert the PEM Key. Using BitViseSSH does not require convertion
Check for Yum Updates
sudo yum check-update
Install updates via Yum
sudo yum update
Install HAProxy from EPEL repository
sudo yum install haproxy
Backup HAProxy configuration
sudo cp /etc/haproxy/haproxy.cfg /etc/haproxy/haproxy.cfg_orig
sudo cp /etc/haproxy/haproxy.cfg /etc/haproxy/haproxy.cfg_backup
Change permissions on haproxy.cfg_orig
sudo chown ec2-user:ec2-user /etc/haproxy/haproxy.cfg_orig
Update the temporary HAProxy configuration file
/etc/haproxy/haproxy.cfg_orig
Below is the working config of current HAPROXY:
The BOLD ITEMS in the config are the variables that need updating.
#---------------------------------------------------------------------
# Example configuration for a possible web application. See the full configuration options online.
# http://haproxy.1wt.eu/download/1.4/doc/configuration.txt
#Global settings
---------------------------------------------------------------------
chroot      /var/lib/haproxy
pidfile     /var/run/haproxy.pid
maxconn     4000
user        haproxy
group       haproxy
daemon

# turn on stats unix socket
stats socket /var/lib/haproxy/stats

global
# to have these messages end up in /var/log/haproxy.log you will
# need to:
#
# 1) configure syslog to accept network log events. This is done
# by adding the '-r' option to the SYSLOGD_OPTIONS in
# /etc/sysconfig/syslog
#
# 2) configure local2 events to go to the /var/log/haproxy.log
# file. A line like the following can be added to
# /etc/sysconfig/syslog
#
# local2.* /var/log/haproxy.log
#
log 127.0.0.1 local2
---------------------------------------------------------------------
common defaults that all the 'listen' and 'backend' sections will use if not designated in their block
---------------------------------------------------------------------
defaults
mode http
log global
option httplog
option dontlognull
option http-server-close
option forwardfor except 127.0.0.0/8
option redispatch
retries 3
timeout http-request 10s
timeout queue 1m
timeout connect 10s
timeout client 1m
timeout server 1m
timeout http-keep-alive 10s
timeout check 10s
maxconn 40000
---------------------------------------------------------------------
main frontend which proxys to the backends
---------------------------------------------------------------------
frontend main *:80
Next two lines added instead of the one above
frontend http-in
bind :80
acl url_static path_beg -i /static /images /javascript /stylesheets
acl url_static path_end -i .jpg .gif .png .css .js
use_backend static          if url_static
default_backend             app

---------------------------------------------------------------------
static backend for serving up images, stylesheets and such
---------------------------------------------------------------------
backend static<br>     balance     roundrobin<br>     server      static 172.1.2.3:8000 check
---------------------------------------------------------------------
round robin balancing between the various backends
---------------------------------------------------------------------

backend app
balance     roundrobin
server  app1 1723.2.1:80 check

<pre class="wp-block-code"><code>#Stat Listeng setup below
listen stats 0.0.0.0:9000       #Listen on all IP's on port 9000
mode http
balance
timeout client 5000
timeout connect 4000
timeout server 30000

#This is the virtual URL to access the stats page
stats uri /haproxy_stats

#Authentication realm. This can be set to anything. Escape space characters with a backslash.
stats realm HAProxy\ Statistics

#The user/pass you want to use. Change this password!
stats auth administrator:password

#This allows you to take down and bring up back end servers.
#This will produce an error on older versions of HAProxy.
stats admin if TRUE
Starting HAProxy
1 sudo service haproxy start
Getting HAProxy’s Status
1 sudo service haproxy status
Stopping HAProxy
1 sudo service haproxy stop
Security Groups
The configuration above would require a security group configured like
• Allow port 22 from your office IP e.g. XXX.XXX.XXX.XXX/32
• Allow 8000 access from your office IP
• Allow HTTP (port 80) access from everyone e.g. 0.0.0.0/0
• Allow HTTPS (port 443) access from everyone
How To prepare your SSL files
Creating a .pem with the Private Key and Entire Trust Chain
- Log into your GoDaddy Account (or actual CA) and download your Intermediate (DigiCertCA.crt) and Primary Certificates (your_domain_name.crt).
- Open a text editor (such as wordpad) and paste the entire body of each certificate into one text file in the following order:
- The Private Key – your_domain_name.key
- The Primary Certificate – your_domain_name.crt
- The Intermediate Certificate – DigiCertCA.crt
- The Root Certificate – TrustedRoot.crt
HOW TO CONVERT between SSL formats available at Raise a CSR and apply SSL on an AWS/IIS/ELB#opensslpkcs7-infile.pem-print_certs-outcerts.pem
Please review the link above if unsure!!! - Make sure to include the beginning and end tags on each certificate. The result should look like this:
-----BEGIN RSA PRIVATE KEY-----
(Your Private Key: your_domain_name.key)
-----END RSA PRIVATE KEY-----
-----BEGIN CERTIFICATE-----
(Your Primary SSL certificate: your_domain_name.crt)
-----END CERTIFICATE-----
-----BEGIN CERTIFICATE-----
(Your Intermediate certificate: DigiCertCA.crt)
-----END CERTIFICATE-----
-----BEGIN CERTIFICATE-----
(Your Root certificate: TrustedRoot.crt)
-----END CERTIFICATE-----
 -----BEGIN RSA PRIVATE KEY-----
 (Your Private Key: your_domain_name.key)
 -----END RSA PRIVATE KEY-----
 -----BEGIN CERTIFICATE-----
 (Your Primary SSL certificate: your_domain_name.crt)
 -----END CERTIFICATE-----
 -----BEGIN CERTIFICATE-----
 (Your Intermediate certificate: DigiCertCA.crt)
 -----END CERTIFICATE-----
 -----BEGIN CERTIFICATE-----
 (Your Root certificate: TrustedRoot.crt)
 -----END CERTIFICATE-----
Save the combined file as your_domain_name.pem. The .pem file is now ready to use.
Adding SSL to HAPROXY
frontend web-https
         bind public_ip:443 ssl crt /etc/ssl/certs/server.bundle.pem
         reqadd X-Forwarded-Proto:\ https
         rspadd Strict-Transport-Security:\ max-age=31536000
         default_backend www-backend
To explain:
• bind public_ip:443 (change public_ip to your VPS public ip) tells HAProxy to listen to any request that is sent to the ip address on port 443 (the HTTPS port).
• ssl crt /etc/ssl/certs/server.bundle.pem tells HAProxy to use the SSL certificate previously generated.
• reqadd X-Forwarded-Proto:\ https adds the HTTPS header to the end of the incoming request.
• rspadd Strict-Transport-Security:\ max-age=31536000 a security policy to prevent against downgrade attacks.
You do not need to make any additional changes to your backend section.
If you wish to have HAProxy use HTTPS by default, add redirect scheme https if !{ ssl_fc } to the beginning of the www-backend section. This will force HTTPS redirection.
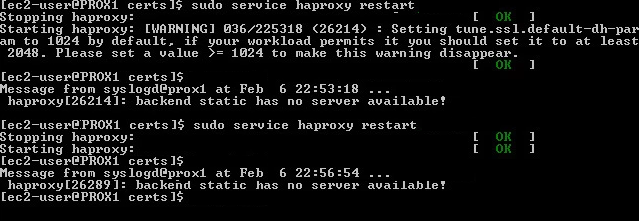
Save your configuration and run service haproxy restart to restart HAPRoxy. Now you’re all set to use HAProxy with an SSL endpoint.
Read more at: https://www.vultr.com/docs/add-ssl-termination-to-haproxy-on-ubuntu
Warning is given off when restaring haproxy. SSL encryption set to default of 1024 is too low. Enforced to 2048 in Global config space in haproxy.cfg file!
tune.ssl.default-dh-param
Sets the maximum size of the Diffie-Hellman parameters used for generating the ephemeral/temporary Diffie-Hellman key in case of DHE key exchange. The
final size will try to match the size of the server’s RSA (or DSA) key (e.g, a 2048 bits temporary DH key for a 2048 bits RSA key), but will not exceed
this maximum value. Default value if 1024. Only 1024 or higher values are allowed. Higher values will increase the CPU load, and values greater than
1024 bits are not supported by Java 7 and earlier clients. This value is not used if static Diffie-Hellman parameters are supplied via the certificate file.
Source: https://cbonte.github.io/haproxy-dconv/configuration-1.5.html#tune.ssl.default-dh-param
UPDATE 2019 – See Usage of CRT-LIST
Used for dedicating a single SSL pem per binding. Utilising multiple port 443 SSL on one server (Unlike the Windows Server single server per port)
Enable HAProxy Logging
Enabling logging in HAProxy is very simple. First edit the rsyslog.conf file:
sudo vi /etc/rsyslog.conf
Then find the following two lines, and uncomment them to enable UDP syslog reception. It should look like the following when you are done:
$ModLoad imudp
$UDPServerRun 514
$UDPServerAddress 127.0.0.1
Now restart rsyslog to enable the new configuration:
sudo service rsyslog restart
HAProxy logging is is now enabled! The log file will be created at /var/log/haproxy.log once HAProxy is started.
SOURCE:
https://www.digitalocean.com/community/tutorials/how-to-implement-ssl-termination-with-haproxy-on-ubuntu-14-04
https://serversforhackers.com/using-ssl-certificates-with-haproxy
SSL with pass-through to backend server ssl termination: https://serversforhackers.com/using-ssl-certificates-with-haproxy
SSL config CMD
Collecting the HAProxy metrics you need
Metrics to monitor and collect them! You can either use HAProxy’s built-in tools or a third-party tool. HAProxy gives you two means by which you can monitor its performance: via a status page, or via sockets. Both of the methods below give you an immediate and detailed view into the performance of your load balancer. The main difference between the two is that the status page is static and read-only, whereas the socket interface allows you to modify HAProxy’s configuration on the fly.
Stats page
The most common method to access HAProxy metrics is to enable the stats page, which you can then view with any web browser. This page is not enabled out of the box, and requires modification of HAProxy’s configuration to get it up and running.
Configuration
To enable the HAProxy stats page, add the following to the bottom of the file /etc/haproxy/haproxy.cfg (adding your own username and password to the final line):
listen stats # Define a listen section called "stats"
  bind :9000 # Listen on localhost:9000
  mode http
  stats enable  # Enable stats page
  stats hide-version  # Hide HAProxy version
  stats realm Haproxy\ Statistics  # Title text for popup window
  stats uri /haproxy_stats  # Stats URI
  stats auth Username:Password  # Authentication credentials
This sets up a listener on port 9000 in HTTP mode with statistics enabled.
Next you’ll need to restart HAProxy, which can interrupt client sessions and cause downtime. If you want to be very careful about how you restart HAProxy, check out Yelp’s research on the least disruptive means by which you can reload HAProxy’s configuration.
If you’re comfortable with session interruption, you can restart HAProxy with
sudo service haproxy restart.
After
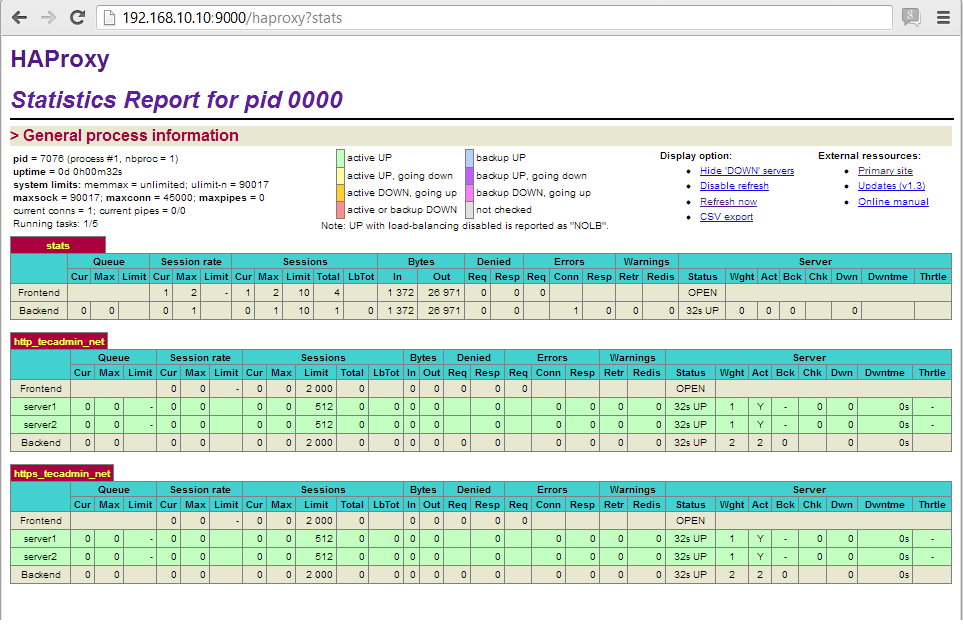
restarting HAProxy with your modified configuration, you can access a
stats page like the one below after authenticating via the URL: http://<YourHAProxyServer>:9000/haproxy_stats
Haproxy has a build in stat page. Set to port 9000 and the dashboard will show up.
Change Login Details
If you want to changed login details of HAProxy stats, edit your configuration and update “stats auth” value like below
stats auth username:password
Save configuration file and restart HAProxy to update service.
Change HAProxy Stats URL
To change url of haproxy stats edit configuration file and update following value.
stats uri /ha-stats
or
stats uri /stats
Third party stats monitoring tools
There is no shortage of third party tools available in the HAProxy community, though many are unmaintained. Luckily, there is HATop. (See http://feurix.org/projects/hatop/)

HATop to this day remains the go-to tool for taking a closer look at a running HAProxy service. HATop was designed to mimic the appearance of htop. It is an excellent management and diagnostics tool capable of overseeing the entirety of your HAProxy service stack.
Once downloaded, start HATop with the following command (assuming HATop is in your PATH): hatop -s /var/run/haproxy.sock
You should see something similar to the screen below:

HAPROXY Failover with EIP reassociation
The idea is to reasocciate the EIP (ElasticIP) in case the primary (MASTER) HAProxy services stops or server goes unresponsive to a secondary standby HAProxy (BACKUP) box
That is achieved by running KEEPALIVED service pinging each other at VRRP protocol each second. In case of lost responce a script is executed to reassociate EIP to backup server running haproxyservice.
That’s close to Emulating Active/passing application clustering with HAProxy
Important palces:
Haproxy config: /etc/haproxy/haproxy.cfg
Keepalived config: /etc/keepalived/keepalived.conf
VRRP.SH script that’s to execute is at: /etc/keepalived/vrrp.sh
Install KEEPALIVED
Keepalived is used for IP failover between two servers. It facilities for load balancing and high-availability to Linux-based infrastructures. It works on VRRP ( Virtual Router Redundancy Protocol ) protocol. We have running two load balance servers using HAProxy and now we need to implement VRRP between both servers.
Keepalived is available in centos base repository. Install it using yum command line tool.
# yum install keepalived
Keepalived configuration File: /etc/keepalived/keepalived.conf
Edit Keepalived configuration file .
The configuration must be set to one like the below:
Here is the main HAPROXY keepalived config
vrrp_script chk_haproxy {
    script "pidof haproxy"
    interval 2 # check every 2 seconds
}

vrrp_instance VI_1 {
    interface eth0 # the primary interface, no secondary one used, or floating IP as in internal IPs with sharing single IP; interface to monitor
    state MASTER # the secondary server should have BACKUP state
    priority 101 # secondary server will be having priority 100 instead

    virtual_router_id 33 # same for both virtual routers, Assign one ID for this route
    unicast_src_ip 10.1.2.3 # PRIVATE IP of  main server , the localhost
    unicast_peer {
        10.3.2.1 #PRIVATE IP of secondary , that is talked to
    }

    authentication {
        auth_type PASS # same for both
        auth_pass 123456 # same for both
    }

    track_script {
        chk_haproxy
    }

    notify_master /etc/keepalived/vrrp.sh # location of the script to run in case of failing haproxy service
}
Notes
1. Priority value will be higher on Master server, It
doesn’t matter what you used in state. If your state is MASTER but your
priority is lower than the router with BACKUP, you will lose the MASTER state.
2. virtual_router_id should be same on both LB1 and LB2
servers.
3. By default single vrrp_instance support up to 20 virtual_ipaddress.
In order to add more addresses you need to add more vrrp_instance
And Here is the secondary HAPROXY
vrrp_script chk_haproxy {
    script "pidof haproxy"
    interval 2
}

vrrp_instance VI_1 {
    interface eth0
    state BACKUP
    priority 100

    virtual_router_id 33
    unicast_src_ip 10.3.2.1
    unicast_peer {
        10.1.2.3
    }

    authentication {
        auth_type PASSWORD
        auth_pass 123456
    }

    track_script {
        chk_haproxy
    }

    notify_master /etc/keepalived/vrrp.sh
}
3. Start KeepAlived service using following command and also configure to auto start on system boot.
# ip addr show eth1

[root@PROX1 haproxy]# ip addr show eth0
2: eth0: <BROADCAST,MULTICAST,UP,LOWER_UP> mtu 9001 qdisc pfifo_fast state UP group default qlen 1000
    link/ether 07:a7:4f:e1:25:00 brd ff:ff:ff:ff:ff:ff
    inet 10.1.1.1/24 brd 10.1.110.255 scope global eth0
       valid_lft forever preferred_lft forever
    inet6 fe80::aa7:ffff:fee0:2505/64 scope link
       valid_lft forever preferred_lft forever
[root@PROX1 haproxy]#
Check Virtual IPs
By default virtual ip will assigned to master server, In case of master get down, it will automatically assigned to slave server. Use following command to show assigned virtual ip on interface.
Verify connection is working via VRRP
# ss – l |grep vrrp
raw    UNCONN     0      0       *:vrrp                  *:*
raw    UNCONN     0      0       *:vrrp                  *:*
[root@PROX1 haproxy]# tcpdump -i eth0 ip proto 112
tcpdump: verbose output suppressed, use -v or -vv for full protocol decode
listening on eth0, link-type EN10MB (Ethernet), capture size 65535 bytes
Communication between both servers must be established, else resolve the Security Groups and visibility to talk.
Troubleshooting Keepalived
If you do not see any communication, than make sure keepalived service started on both nodes:
# service keepalived status
# service keepalived start
Firewall
Make sure firewall is configured to accept accept multicast and vrrp protocol (IP Protocol # 112): Usually not required!
# /sbin/iptables -I INPUT -i eth0 -d
224.0.0.0/8 -j ACCEPT
# /sbin/iptables -A INPUT -p 112 -i eth0 -j ACCEPT
# /sbin/iptables -A OUTPUT -p 112 -o eth0 -j ACCEPT
# /sbin/service iptables save
Add the following for CentOS/RedHat/Fedora:
Tell kernel to allow binding non-local IP into the hosts and apply the
changes:
Edit following /etc/sysctl.conf
# net.ipv4.ip_nonlocal_bind = 1
Apply changes
sysctl -p
Identify running and as what
To determine whether a server is acting as the master, you can use the ip command to see whether the virtual address is active, for example:
# ip addr list eth0 3: eth0: <BROADCAST,MULTICAST,UP,LOWER_UP> mtu 1500 qdisc pfifo_fast state UP qlen 1000 link/ether 08:00:27:cb:a6:8d brd ff:ff:ff:ff:ff:ff inet 10.0.0.72/24 brd 10.0.0.255 scope global eth0 inet 10.0.0.100/24 scope global eth0 inet6 fe80::a00:27ff:fecb:a68d/64 scope link valid_lft forever preferred_lft foreverAlternatively, search for Keepalived messages in /var/log/messages that show transitions between states, for example:
...51:55 ... VRRP_Instance(VRRP1) Entering BACKUP STATE
...
...53:08 ... VRRP_Instance(VRRP1) Transition to MASTER STATE
...53:09 ... VRRP_Instance(VRRP1) Entering MASTER STATE
...53:09 ... VRRP_Instance(VRRP1) setting protocol VIPs.
...53:09 ... VRRP_Instance(VRRP1) Sending gratuitous ARPs on eth0 for 10.0.0.100
Create a vrrp.sh script
That’s a simple script that holds the AWS credentials and the reassociation command to move EIP to backup server when triggered!
#!/bin/bash
#vrrp.sh
#Add this line in ordet to detect when script is executed
echo “———-vrrp.sh running ——” >> /var/log/messages
#Change dir to executable area
cd /opt/aws/apitools/ec2/bin/
#Those are the actual access/secret keys!!!
export JAVA_HOME=/etc/alternatives/jre
export EC2_HOME=/opt/aws/apitools/ec2
export AWS_ACCESS_KEY=AKIA12345000000000000
export AWS_SECRET_KEY=123432543534000000000
export EC2_URL=https://ec2.eu-west-1.amazonaws.com
export PATH=$PATH:$JAVA_HOME/bin:$EC2_HOME/bin
#EIP reassociation command, assigning EIP to secondary HAProxy server
./ec2-associate-address -a eipalloc-abcd1234 -i i-012345abcd –allow-reassociation
AWS EC command in vrrp.sh script
aws ec2 associate-address –instance-id i-012345abcd –public-ip 1.2.3.4
associate-address
[--dry-run | --no-dry-run]
[--instance-id <value>]
[--public-ip <value>]
[--allocation-id <value>]
[--network-interface-id <value>]
[--private-ip-address <value>]
[--allow-reassociation | --no-allow-reassociation]
[--cli-input-json <value>]
[--generate-cli-skeleton]
Commands slightly differs for EC2-Classic and VPC instances
Options
–dry-run | –no-dry-run (boolean)
Checks whether you have the required permissions for the action, without actually making the request, and provides an error response. If you have the required permissions, the error response is DryRunOperation . Otherwise, it is UnauthorizedOperation .
–instance-id (string)
The ID of the instance. This is required for EC2-Classic. For EC2-VPC, you can specify either the instance ID or the network interface ID, but not both. The operation fails if you specify an instance ID unless exactly one network interface is attached.
–public-ip (string)
The Elastic IP address. This is required for EC2-Classic.
–allocation-id (string)
[EC2-VPC] The allocation ID. This is required for EC2-VPC.
–network-interface-id (string)
[EC2-VPC] The ID of the network interface. If the instance has more than one network interface, you must specify a network interface ID.
–private-ip-address (string)
[EC2-VPC] The primary or secondary private IP address to associate with the Elastic IP address. If no private IP address is specified, the Elastic IP address is associated with the primary private IP address.
–allow-reassociation | –no-allow-reassociation (boolean)
[EC2-VPC] For a VPC in an EC2-Classic account, specify true to allow an Elastic IP address that is already associated with an instance or network interface to be reassociated with the specified instance or network interface. Otherwise, the operation fails. In a VPC in an EC2-VPC-only account, reassociation is automatic, therefore you can specify false to ensure the operation fails if the Elastic IP address is already associated with another resource.
–cli-input-json (string) Performs service operation based on the JSON string provided. The JSON string follows the format provided by –generate-cli-skeleton. If other arguments are provided on the command line, the CLI values will override the JSON-provided values.
–generate-cli-skeleton (boolean) Prints a sample input JSON to standard output. Note the specified operation is not run if this argument is specified. The sample input can be used as an argument for –cli-input-json.
Examples
To associate an Elastic IP addresses in EC2-Classic
This example associates an Elastic IP address with an instance in EC2-Classic. If the command succeeds, no output is returned.
Command: aws ec2 associate-address –instance-id i-0123456789 –public-ip 1.2.3.4
To associate an Elastic IP address in EC2-VPC
This example associates an Elastic IP address with an instance in a VPC.
Command: aws ec2 associate-address –instance-id i-987654321 –allocation-id eipalloc-abcd1234
Output:
{
    "AssociationId": "eipassoc-2bebb745"
}
This example associates an Elastic IP address with a network interface.
Command: aws ec2 associate-address –allocation-id eipalloc- 987654321a –network-interface-id eni- 12345abcd
This example associates an Elastic IP with a private IP address that’s associated with a network interface.
Command: aws ec2 associate-address –allocation-id eipalloc-987654321a –network-interface-id eni- 12345abcd –private-ip-address 10.0.0.xx
Required IAM permissions
The aboved User access keys reflect the role attached to the above user keys. That’s basically association and describe ec2 tasks:
Use the following IAM policys to be able to list and reassociate Elastic IPs. This can probably be narrowed down abit. It allows EC2 read-only (from the IAM wizard) and ec2:ReassociateAddress permissions:
{
  "Statement": [
    {
      "Effect": "Allow",
      "Action": [
        "ec2:AssociateAddress",
        "ec2:AttachNetworkInterface",
        "ec2:CreateNetworkInterface",
        "ec2:DescribeInstances",
        "ec2:DescribeNetworkInterfaces",
        "ec2:DescribeSecurityGroups",
        "ec2:DescribeSubnets",
        "ec2:DetachNetworkInterface"
        "ec2:Describe*",
 ],
      "Resource": "*"
    }
  ]
}
Additional NOTES – gained throughout the scripts buildup
1.And make sure your shell script is executable (chmod +x) <filename>
The man page of chmod covers that.
- u stands for user.
- g stands for group.
- o stands for others.
- a stands for all.
That means that chmod u+x somefile will grant only the owner of that file
execution permissions whereas chmod +x
somefile is the same as chmod
a+x somefile.
chmod u+x will
made the file executable for your user (it will only add it for your user,
though it may be already executable by the group owner, or “other”).
chmod +x or chmod a+x(‘all plus executable bit’) makes the file executable by everyone.
2. Use the binding to nonlocal IP if using virtual/floating IP: # net.ipv4.ip_nonlocal_bind = 1
3. Edit /etc/default/haproxy
and make sure it has a line that says ENABLED=1
in it.
4. Showing of assigned IPs to an interface: # ip addr list eth0
5. Only one server should be active as the master at any time. If more than one server is configured as the master, it is likely that there is a problem with VRRP communication between the servers. Check the network settings for each interface on each server and check that the firewall allows both incoming and outgoing VRRP packets for multicast IP address 224.0.0.18. Valid for floating/Virtual IP mostly
6. Any scripts is always starting with #! – Shebang
(Unix), the #! syntax
used in computer programs to indicate an interpreter for execution
Among UNIX shell (user interface) users, a shebang is a term for the “#!” characters that must begin the first line of a script. In musical notation, a “#” is called a sharp and an exclamation point – “!” – is sometimes referred to as a bang. Thus, shebang becomes a shortening of sharp-bang
#!/bin/bash
#vrrp.sh
7. Monitor messages with # tail -f /var/log/messages
8.Setup can be improved with using AWSCLI insteade AWS EC2
9. Identify autostart services in Fedora:
chkconfig
A built-in system command called chkconfig can also show you startup services that are available on RedHat-based systems. To find a list of currently active startup services, run the following:
$ chkconfig –list | grep $(runlevel | awk ‘{ print $2 }’):on
10. Configure Logging for HAPROXY – in config
One of the first things you should do is to set up proper logging for your HAProxy, which will be useful for future debugging. Log configuration can be found in the global section of /etc/haproxy/haproxy.cfg. The following are distro-specific instructions for configuring logging for HAProxy.
CentOS or RHEL:
To enable logging on CentOS/RHEL, replace:
log 127.0.0.1 local2 with
log 127.0.0.1 local0 Review of Backend Loadbalancing options
The backend section of the configuration file is responsible for the balancing algorithm. Haproxy has 9 algorithms.
Roundrobin
The first in the list and the simplest algorithm is Round Robin. You can turn it on by entering “balance round robin” in the backend section.
With this option, HAProxy will iterate over the servers and evenly load your “farm”. The example:
- backend
- balance roundrobin
- server srv1 server1:80
- server srv2 sever2:80
* in my case luna-1 — it is an alias inside the private network. In your case, it could be IP-address.
If you’ll add to the server list the weight parameter, you’ll get a more advanced version of the algorithm called weighted round robin:
- backend
- balance roundrobin
- server srv1 server1 1:80 weight 2
- server srv2 server12:80 weight 1
Due to different values of weights, the balancer distributes the load based on the physical capabilities of the servers. And a server with a weight parameter 2 in the example above gets 2 times more requests than with a weight parameter of 1.
PRO: The algorithm could achieve a clear, predictable and stable balancing. All servers in this case, in accordance with their weight value, get a fair number of processing requests.
CON: However, the Round Robin has one drawback, which prevents of using it with long sessions. The algorithm ignores the number of active connections. And even if one node is fully loaded, it will still receive new requests.
Static-rr
I will say briefly about this algorithm. In fact, the Static-rr it’s the same as Round robin. One exception: change of the servers’ weight on the fly will have no effect. But Static-rr is not limited by the number of backends in contrast to Round robin, which can work with up to 4095 active servers.
You can turn it on by entering “balance static-rr” in the backend section.
- backend
- balance static-rr
- server srv1 server1 :80
- server srv2 server2:80
Least Connections
The algorithm called “least connections” count the number of active connections to each server. Thus, every following request is delivered to the server with the lowest number of active connections. You can turn the algorithm on by entering “balance leastconn” in the backend section.
- backend
- balance leastconn
- server srv1 server1 :80
- server srv2 server2:80
This algorithm is dynamic, which means that server weights may be adjusted on the fly for slow starts for instance.
PRO: “Least connections” is suitable for tasks associated with long-term connections. For example, it could be load balancing between database servers. If some nodes would have too many active connections, they will not get new queries.
CON: There is no sense to use the algorithm for tasks with short sessions, it could be HTTP protocol for example. For this purposes, it will be better to use a Round Robin option.
First
The algorithm appeared in HAProxy from version 1.5. If you apply it, the balancer will start to fill free connection slots from the first server to the next one by one.
To turn the algorithm on you should enter “balance first” in the backend section.
- backend
- balance first
- server srv1 server1 :80 maxconn 1000
- server srv2 server2:80 maxconn 2000
PRO: The main goal of the algorithm “First” is to use the least amount of servers. It allows you to turn off additional servers in non-intensive hours. To feel the full effect you should set a controller for regularly checking the servers in the farm. It will be turning off unused servers and turning on additional resources at high load.
CON: I can’t say that it is a minus due to the nature of the algorithm. However, the algorithm doesn’t take into consideration the weight of the servers and balance the load depending on maxconn value.
Source
By using this algorithm, the source IP address is hashed and divided by the total weight of the running servers to determine which server will receive the request. Therefore, a source with the same IP address will always be directed to the same server. You can enable this option using “balance source”.
PRO: The algorithm is usually used to work by the TCP Protocol, where it is impossible to assign cookies.
CON: If the source has a dynamic IP, the algorithm will not be able to link its session to the same server.
URI
The algorithm selects a server based on a page address. It allows the same server to handle specific page addresses. You can enable the algorithm using the “balance uri” option.
+ The algorithm is used for load balancing between caching servers. If you’ll try to use other solutions, the total cache size on all nodes will be inflated. In the case of the URI algorithm, a request gotten from a specific address will be sent
to the server which has the cache for this page.
CON: The disadvantage of the algorithm is its narrow specificity of application. My opinion is that the history with caching servers is the only one where the solution is applicable.
URL parameter
The URL parameter algorithm chooses a server based on the GET parameter of the query. If you’ll add the modifier “check_post”, then the algorithm will be making decisions depending on the argument of the parameter. For clarity, I’m going to show you two examples:
- balance url_param userid
- balance url_param session_id check_post 64
In the first example, the algorithm will route user requests to the same server based on the value of their userid. In the second example, the algorithm will assign a specific server for processing requests with a session id 64.
If no parameters are received, the algorithm will balance the load like a Round robin.
PRO: URL parameter может быть полезен, если вы хотите закрепить сервера за авторизованными пользователями, а для анонимных распределять нагрузку с помощью простого Round Robin.
CON: The algorithm will only work in HTTP mode. It is useless for TCP traffic.
HDR
The algorithm selects a server based on an HTTP request header. If there won’t be any value in the header, it will work like the Round Robin algorithm.
- balance hdr(User-Agent: Mozilla/5.0)
In this case, HAProxy will look for the entry “User-Agent: Mozilla / 5.0” in the request header.
PRO: The algorithm will be useful if you need, for example, to link users to servers by browser type, query address, and so on.
CON: On the other hand, the algorithm is suitable for very specific narrow tasks.
rdp-cookie
The algorithm is equivalent to ACL ‘req_rdp_cookie ()’ of the Frontend section. Its purpose is to link the same user to a specific server same server with the identification of the cookie. Its purpose is to link the same user to a specific server by cookies identification.
PRO: The algorithm is suitable for linking sessions with certain cookies to specific servers.
CON: If cookies are not used by the client, the algorithm will work as a primitive Round robin.
Conclusion
Usually, 2 algorithms from the list are used: Round Robin and Leastconn. The first is useful for HTTP traffic and the second one for database maintenance. The rest algorithms are used depending on the situation.